Important: The functionality described on this page is only available to customers who have licensed Veeva AI.
Note: Standard and system-managed agents use Veeva AI Basic and Veeva AI Advanced respectively. You cannot change these settings on standard and system-managed agents.
 ) in the upper right of the Vault interface when viewing a document via the Doc Info page.
7. Select **Summarize Document**.
If your LLM connection is properly configured, Veeva AI Chat responds with a document summary. You can now begin configuring custom agents.
## Standard Agents {#standard-agents}
By default, your Vault includes two standard agents with the following agent actions:
* _Base Document Chat Agent_
* _Summarize Document_
* _Translate Document_
* _Ask Questions_
* _Base Object Chat Agent_
* _Summarize Record_
* _Translate Record_
* _Ask Question_
These default agent actions are only available to your users if you activate the _Base Document Chat Agent_ and _Base Object Chat Agent_ in your Vault. You cannot edit or delete standard agents or any of their agent objectives, context, or actions.
These agents fall under the _Base Document Class_ and _Base Object Class_ respectively. Currently, when configuring a custom agent, you can only create agents within these classes.
## How to Configure a Custom Agent {#configure-custom-agent}
To configure a custom Agent:
1. Navigate to **Admin** > **Configuration** > **agents**.
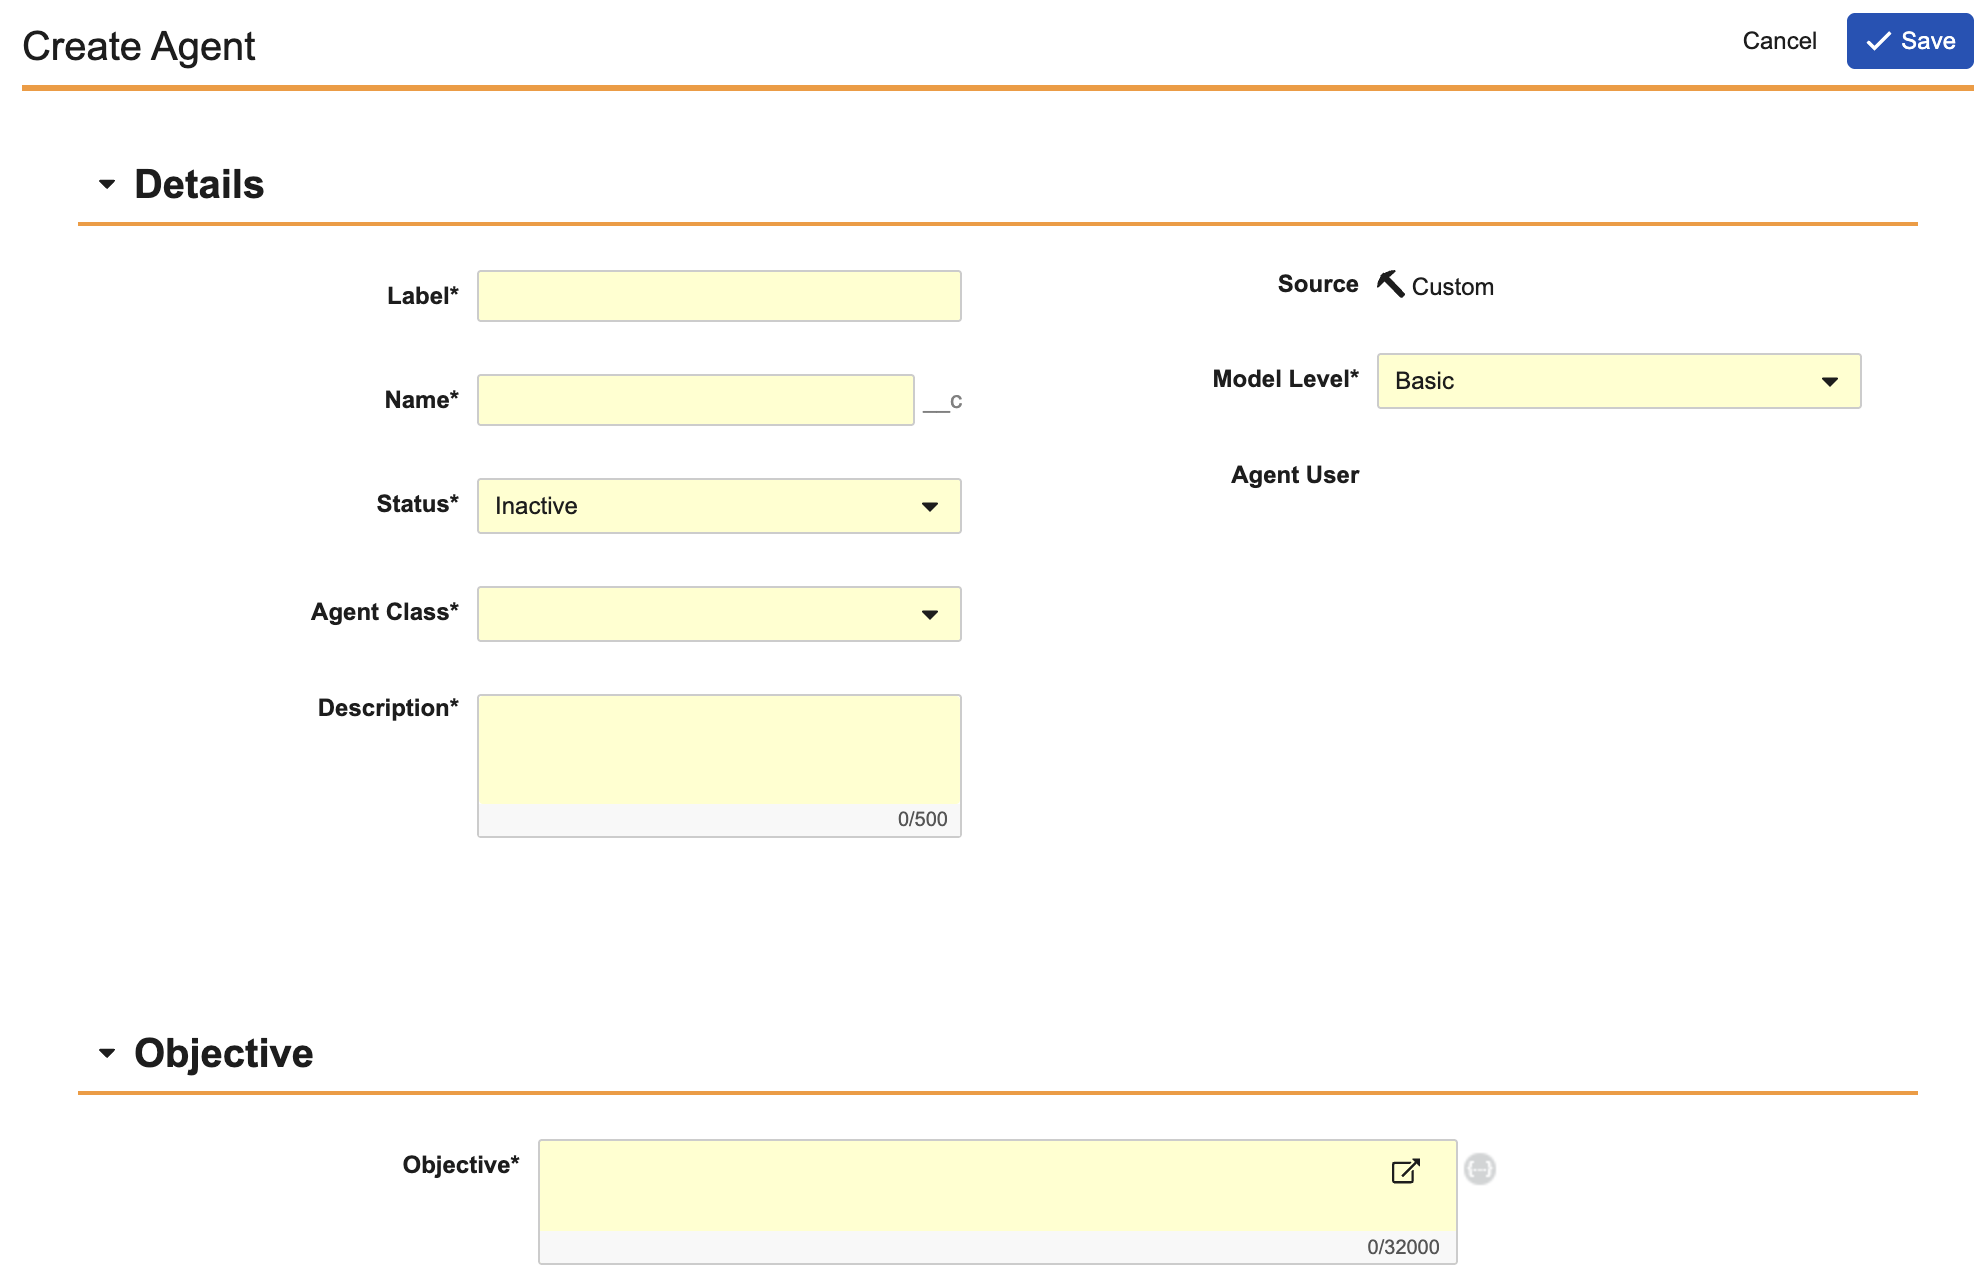
2. Click **Create** to access the _agent Configuration_ page.
3. Enter a **Label**. The **Name** value is populated based on the **Label**.
4. Set the **Status** to **Active** or **Inactive**. By default, new agents are created in the _Inactive_ status. If the agent is **Inactive**, its related agent actions are not displayed in Veeva AI Chat. An agent action is required to set the _Status_ to _Active_. Once activated, an [agent user][10] is either created or reused if available.
5. In the **Agent Class** drop-down, select **Base Document Class** to create a document agent or select **Base Object Class** to create an object agent. You cannot undo this selection.
* If you selected **Base Document Class**, select the **Document Type** where this agent can perform agent actions.
* Optional: If you selected **Base Object Class**, select the **Primary Object** and **Object Type** where this agent can perform agent actions.
6. Enter a **Description**. Ensure the description is clear and precise as Vault sends this information to your LLM to help it understand the basic purpose of the agent.
7. Select the agent's **Model**: [**Basic** or **Advanced**][2]. This setting determines whether the agent will operate with your Basic or Advanced LLM.
8. Enter the agent's **Objective**. This description should reflect the roles and responsibilities of the agent. You can write the description as if you are talking to the agent. For example, a Site Visit agent objective could read, "Your primary objective is to summarize, quality check, and translate specific site visit object records." Use [field reference syntax](/en/lr/796234/#word-fo-field-reference-syntax) to include attributes such as fields, labels, and user names in the agent objective. Select the {…} icon to insert object or document-related [tokens](/en/lr/6382/) into the agent objective.
9. Optional: Enter a **Supplemental Objective**. This field is only available on standard and system-managed agents based on application family availability. Use supplemental objectives to add supporting information to the agent objective. Supplemental objectives are not meant to replace the original agent objective.
10. Click **Save**.
The basic details on the agent are now configured. Next, configure the [agent context][4].
) in the upper right of the Vault interface when viewing a document via the Doc Info page.
7. Select **Summarize Document**.
If your LLM connection is properly configured, Veeva AI Chat responds with a document summary. You can now begin configuring custom agents.
## Standard Agents {#standard-agents}
By default, your Vault includes two standard agents with the following agent actions:
* _Base Document Chat Agent_
* _Summarize Document_
* _Translate Document_
* _Ask Questions_
* _Base Object Chat Agent_
* _Summarize Record_
* _Translate Record_
* _Ask Question_
These default agent actions are only available to your users if you activate the _Base Document Chat Agent_ and _Base Object Chat Agent_ in your Vault. You cannot edit or delete standard agents or any of their agent objectives, context, or actions.
These agents fall under the _Base Document Class_ and _Base Object Class_ respectively. Currently, when configuring a custom agent, you can only create agents within these classes.
## How to Configure a Custom Agent {#configure-custom-agent}
To configure a custom Agent:
1. Navigate to **Admin** > **Configuration** > **agents**.
2. Click **Create** to access the _agent Configuration_ page.
3. Enter a **Label**. The **Name** value is populated based on the **Label**.
4. Set the **Status** to **Active** or **Inactive**. By default, new agents are created in the _Inactive_ status. If the agent is **Inactive**, its related agent actions are not displayed in Veeva AI Chat. An agent action is required to set the _Status_ to _Active_. Once activated, an [agent user][10] is either created or reused if available.
5. In the **Agent Class** drop-down, select **Base Document Class** to create a document agent or select **Base Object Class** to create an object agent. You cannot undo this selection.
* If you selected **Base Document Class**, select the **Document Type** where this agent can perform agent actions.
* Optional: If you selected **Base Object Class**, select the **Primary Object** and **Object Type** where this agent can perform agent actions.
6. Enter a **Description**. Ensure the description is clear and precise as Vault sends this information to your LLM to help it understand the basic purpose of the agent.
7. Select the agent's **Model**: [**Basic** or **Advanced**][2]. This setting determines whether the agent will operate with your Basic or Advanced LLM.
8. Enter the agent's **Objective**. This description should reflect the roles and responsibilities of the agent. You can write the description as if you are talking to the agent. For example, a Site Visit agent objective could read, "Your primary objective is to summarize, quality check, and translate specific site visit object records." Use [field reference syntax](/en/lr/796234/#word-fo-field-reference-syntax) to include attributes such as fields, labels, and user names in the agent objective. Select the {…} icon to insert object or document-related [tokens](/en/lr/6382/) into the agent objective.
9. Optional: Enter a **Supplemental Objective**. This field is only available on standard and system-managed agents based on application family availability. Use supplemental objectives to add supporting information to the agent objective. Supplemental objectives are not meant to replace the original agent objective.
10. Click **Save**.
The basic details on the agent are now configured. Next, configure the [agent context][4].
Note: You can use Bulk Translation to translate the Label field on agents and agent actions.
### Agent Users {#agent-users}
When a custom agent is activated, Vault creates and assigns an _Agent User_ record to the agent. The agent user allows agent actions to execute without a user at the keyboard, such as through a job or email processor.
Once the agent user is assigned, the _Agent User_ field on the _Agent Configuration_ page is populated with a link to the _Agent User_ record. These records are system-managed and include the following fields:
* **Username**: A username that follows a specific pattern: `[agent][agent_name]@domain.com`. For example, `[agent]deviation__c@vernbio.com` is the _Deviation_ agent's agent user.
* **Email**: `no-reply@veeva.com`
* **First Name**: Agent _Label_ in the Vault's base language. For example, _Deviation_. If the agent's _Label_ is updated, this field is updated as well with the new _Label_.
* **Last Name**: Agent
* **Language**: Base Vault _Language_
* **Locale**: Base Vault _Locale_
* **Time Zone**: Default Vault time zone
* **Security Policy**: System Managed
* **License Type**: Full
* **Application License**: Null
* **Security Profile**: Read-only User
You can only edit the _Security Profile_ and any custom fields added to the _User_ object on _Agent User_ records. Some fields, such as _Language_, _Locale_, and _Security Profile_, may vary for standard agents based on application.
If an agent is deleted, Vault sets the agent user's _Status_ to _Inactive_. Vault can reuse this agent user if a new agent is created or activated with the same _Name_.
Note: You cannot log in as an agent user in any scenario, such as using delegation access. In addition, you cannot associate a Person record to an Agent User record.
Note: Changing an agent’s Name may break API integrations.
Note: If Images is selected, only the first 20 pages are included with an agent action.
 ### How to Configure Object Agent Context {#object-agent-context}
To configure agent context for a _Base Object Class_ agent:
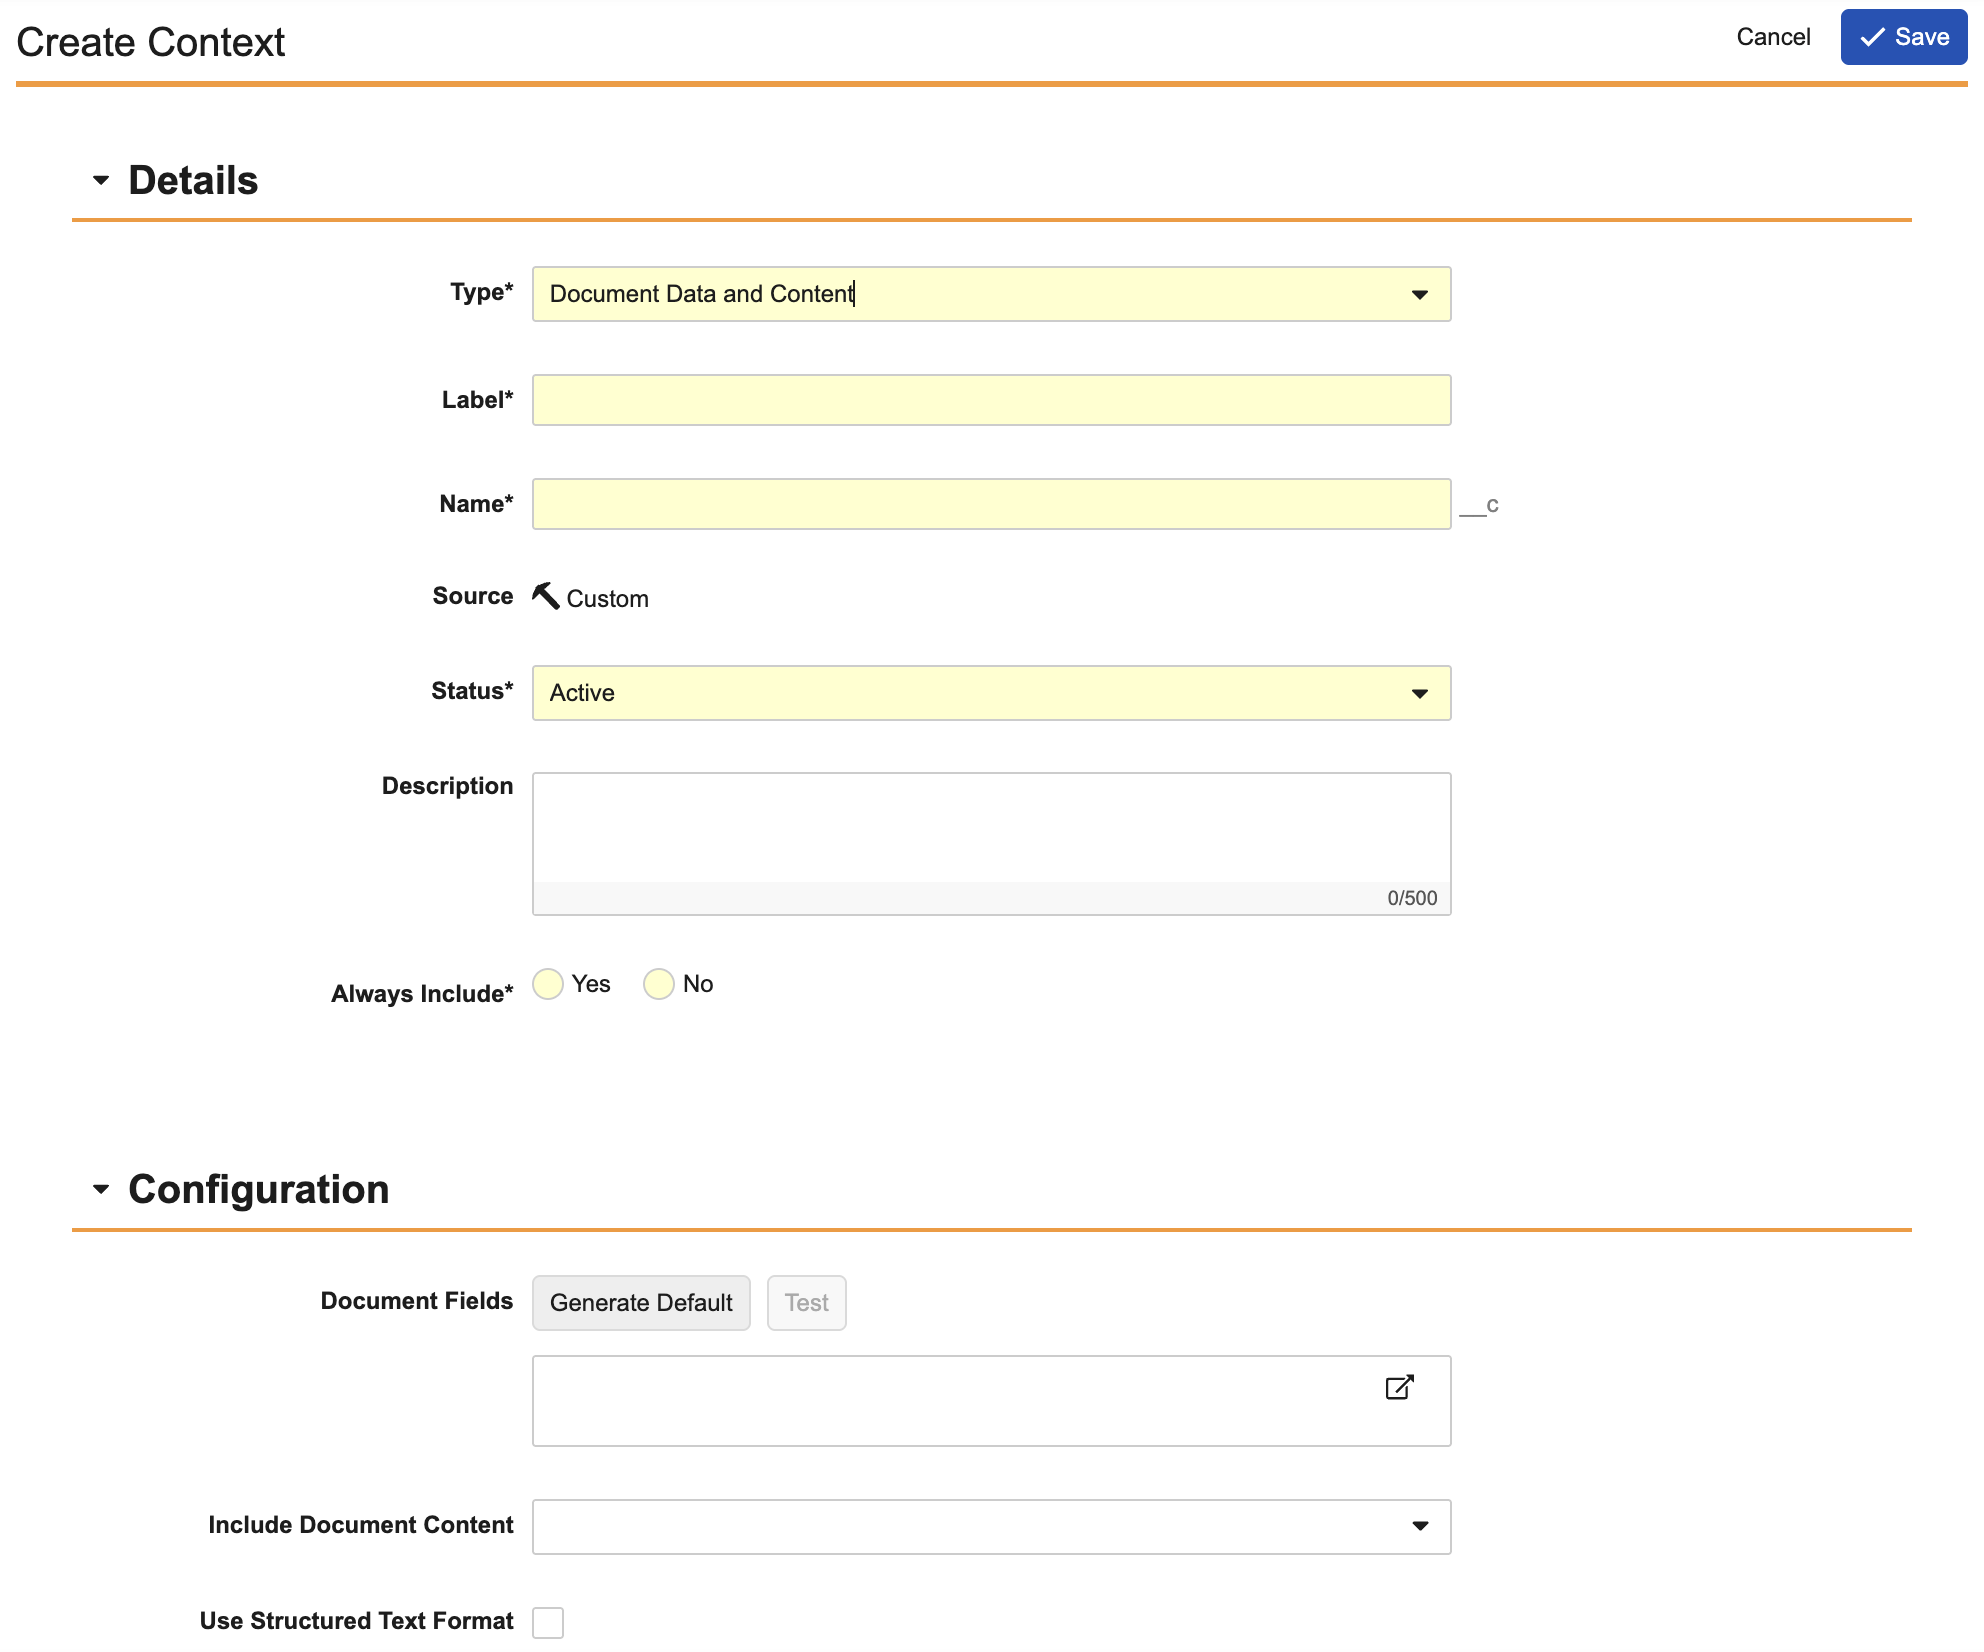
1. Select **Context** on the _Agent Configuration_ page.
2. Click **Create**.
3. Enter a **Label**. The API **Name** value is populated based on the **Label** value.
4. Set the **Status** to **Active** or **Inactive**. By default, new agent context is created in the **Active** status.
5. Optional: Enter a **Description**. Ensure the description is clear and precise as Vault sends this information to your LLM to help it understand and execute the agent context.
6. Select **Yes** on the **Always Include** setting to automatically include this agent context with each agent action configured in this agent. Select **No** to manually include the agent context with each agent action as necessary.
7. Enter **Object Fields** to prompt the agent action to display the field labels and values in the Veeva AI Chat response. You can click [**Generate Default**][5] to display a template you can use to enter the object fields. After saving the agent context, click [**Test**][9] to view the fields used with an object record.
8. Click **Save**.
The agent context is now available for use with agent actions configured within your _Base Object Class_ agent. Next, configure the [agent actions][6].
### How to Configure Object Agent Context {#object-agent-context}
To configure agent context for a _Base Object Class_ agent:
1. Select **Context** on the _Agent Configuration_ page.
2. Click **Create**.
3. Enter a **Label**. The API **Name** value is populated based on the **Label** value.
4. Set the **Status** to **Active** or **Inactive**. By default, new agent context is created in the **Active** status.
5. Optional: Enter a **Description**. Ensure the description is clear and precise as Vault sends this information to your LLM to help it understand and execute the agent context.
6. Select **Yes** on the **Always Include** setting to automatically include this agent context with each agent action configured in this agent. Select **No** to manually include the agent context with each agent action as necessary.
7. Enter **Object Fields** to prompt the agent action to display the field labels and values in the Veeva AI Chat response. You can click [**Generate Default**][5] to display a template you can use to enter the object fields. After saving the agent context, click [**Test**][9] to view the fields used with an object record.
8. Click **Save**.
The agent context is now available for use with agent actions configured within your _Base Object Class_ agent. Next, configure the [agent actions][6].
 ### Agent Context Field Configuration {#agent-context-field-configuration}
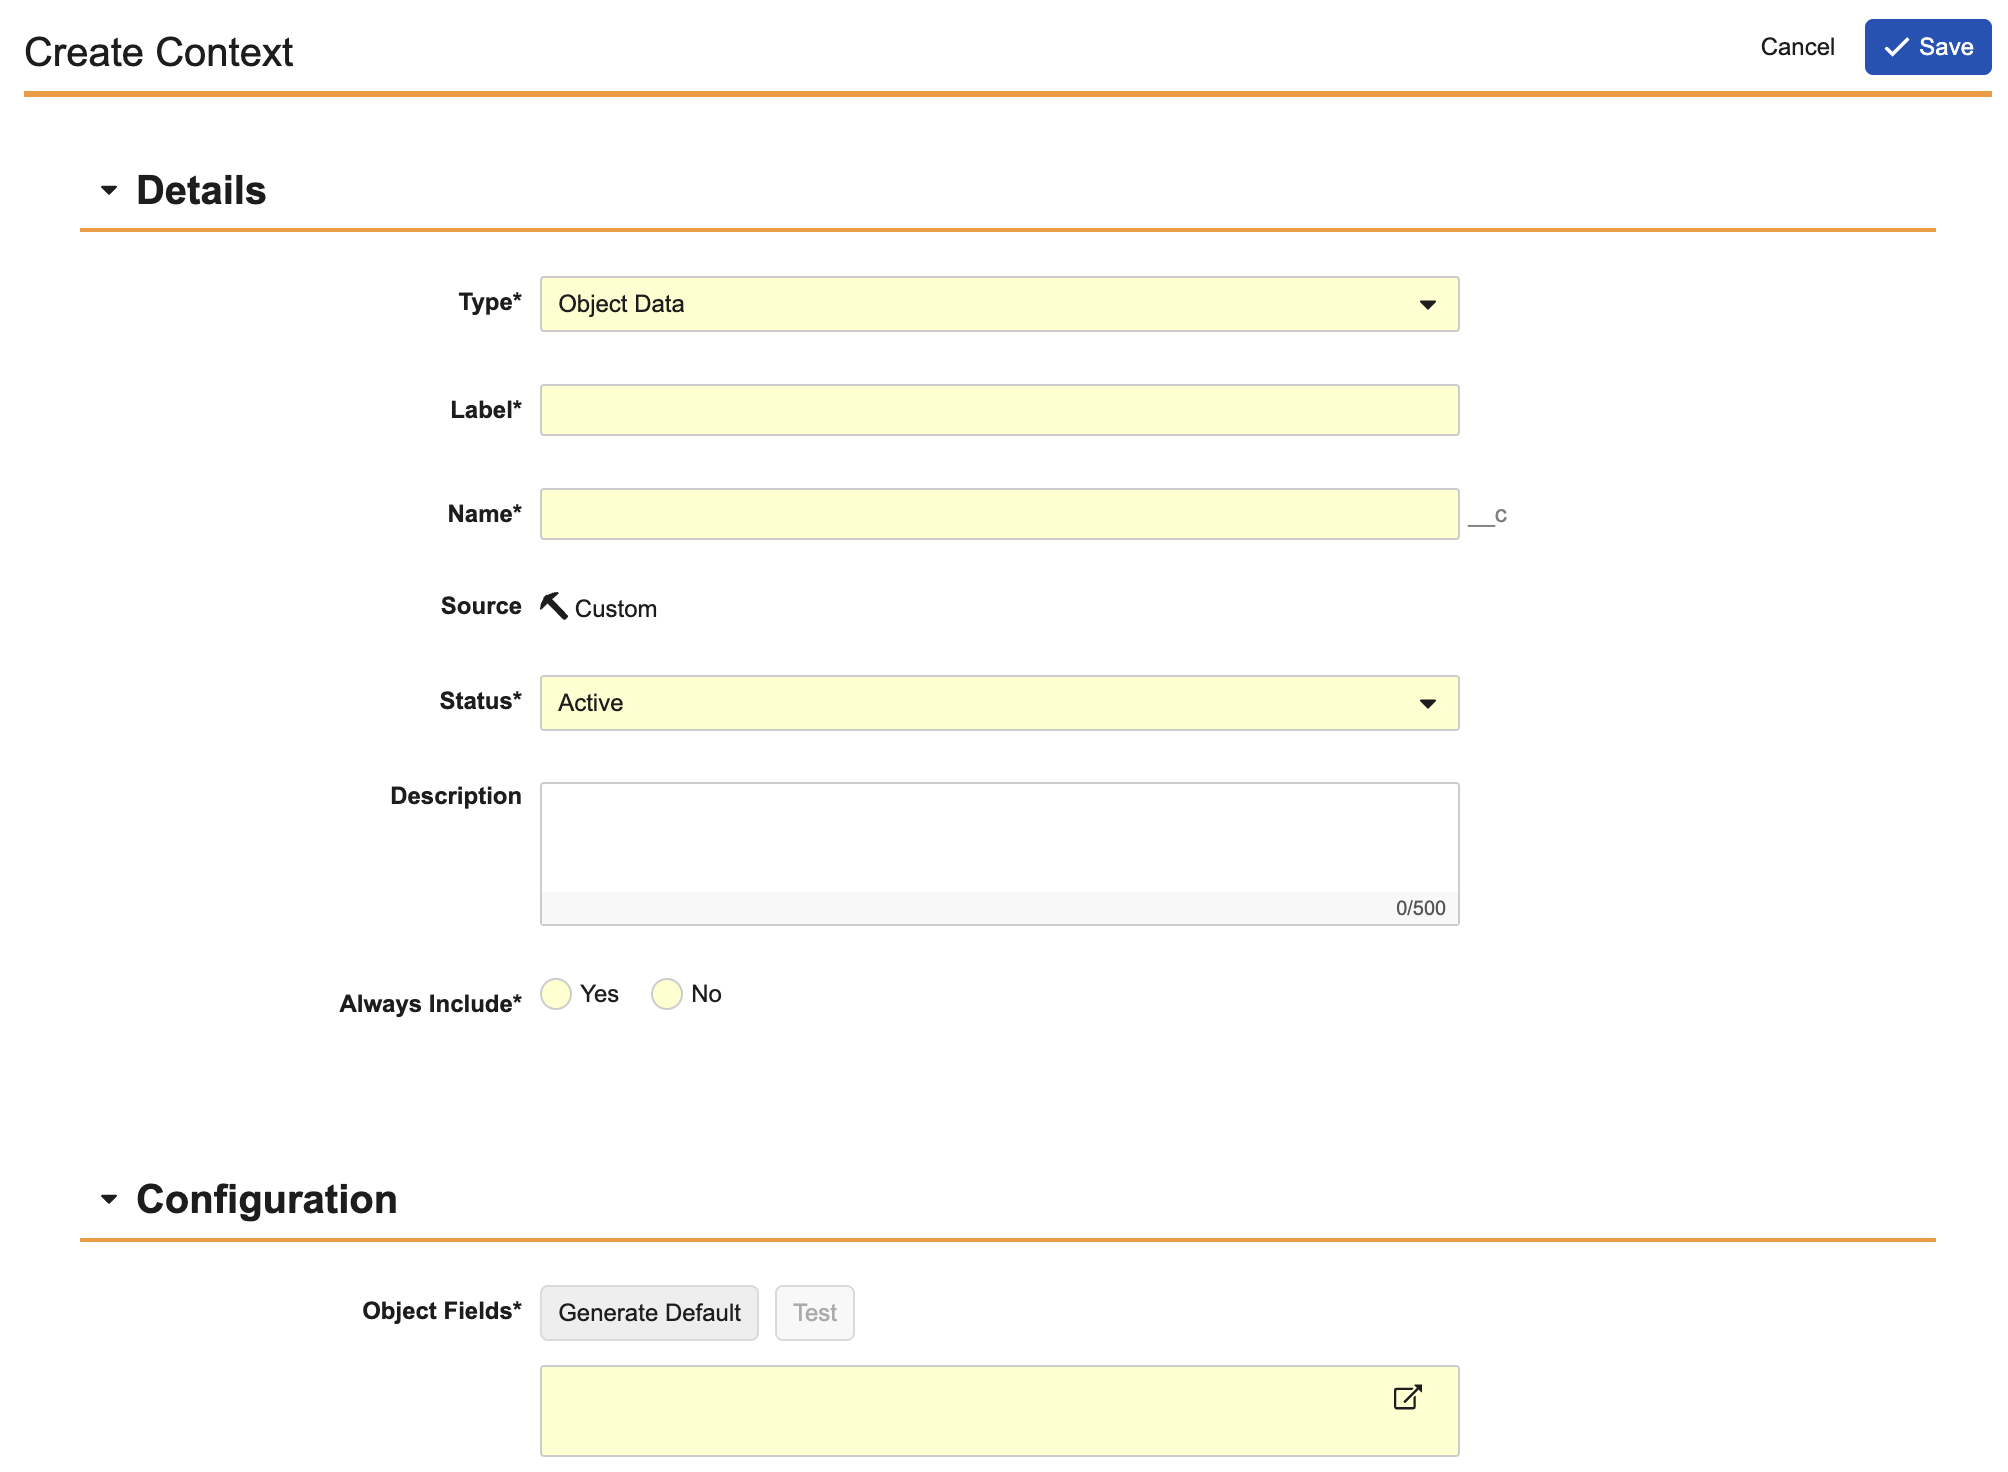
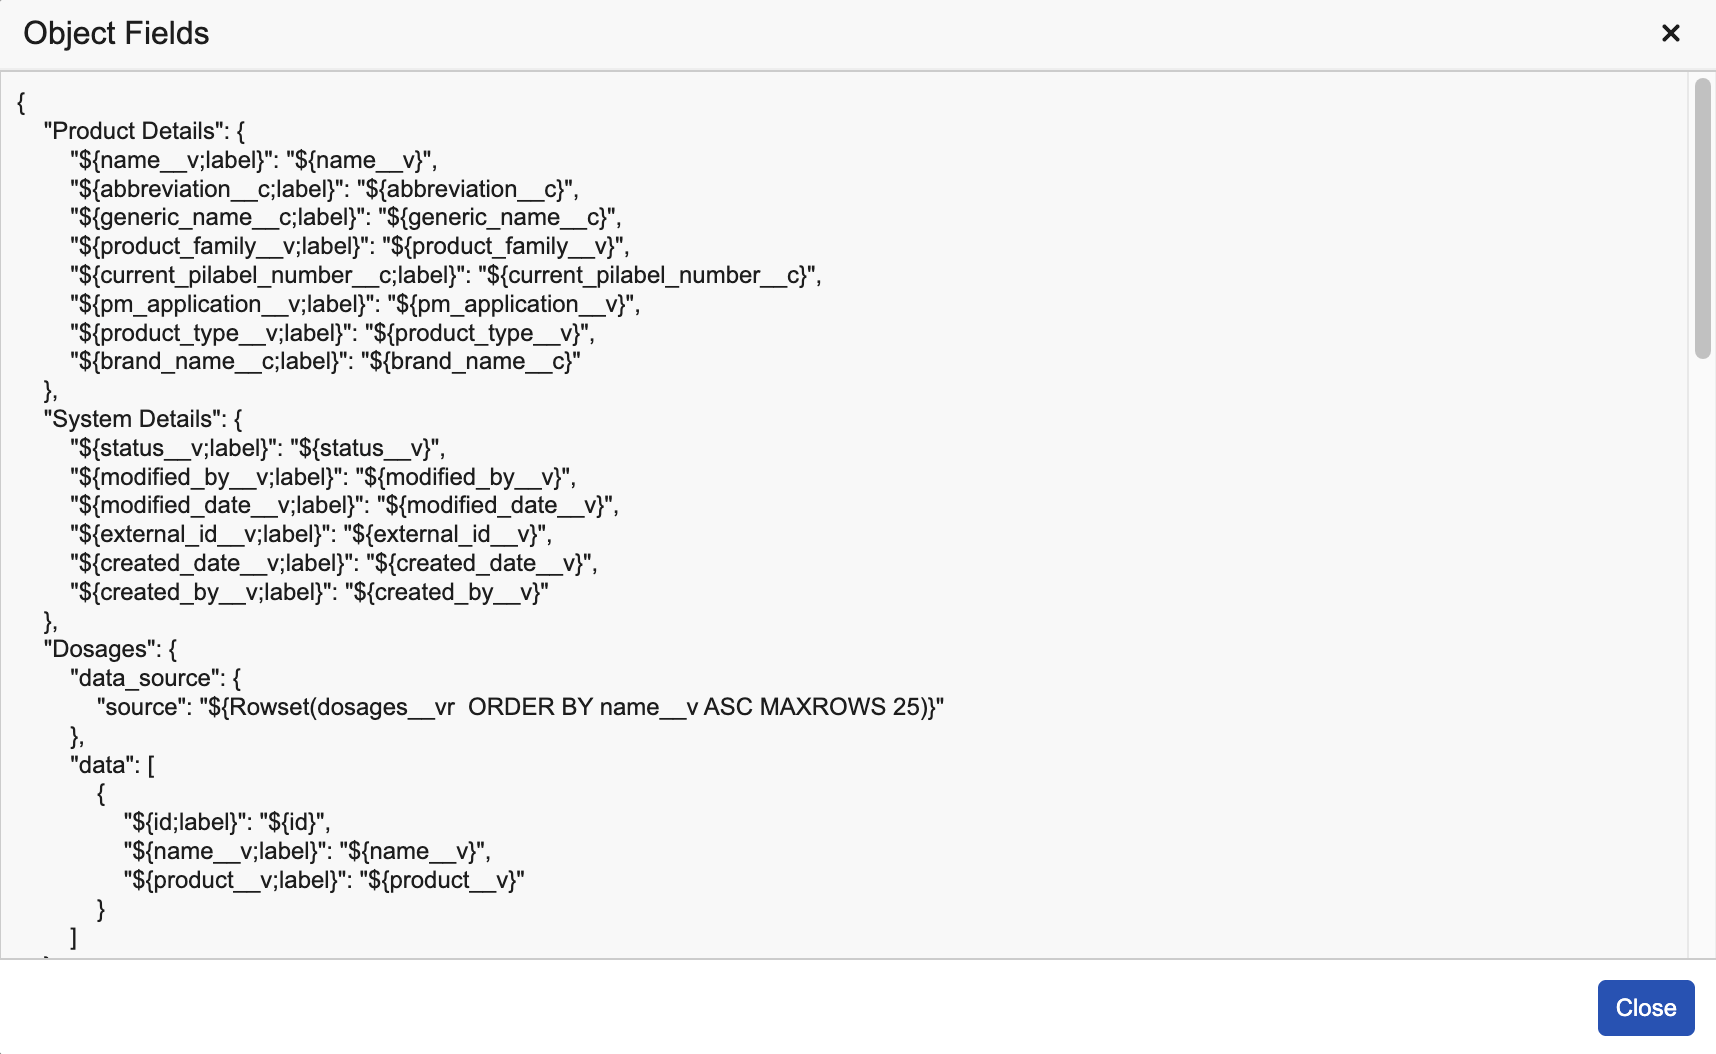
Agent context with document or object fields prompts the agent action to extract the field values and display them in Veeva AI Chat responses. For example, you can use agent context to prompt the _Summarize Document_ action to return the _Name_, _Created Date_, and _Last Modified Date_ of a document the user is viewing in Vault. You can also use agent context to return field values from related and child records in a _Summarize Record_ action.
Click **Generate Default** to display a template you can use to add fields to the agent context. Document agent context templates include fields from the agent's selected _Document Type_ and those available on the Doc Info page. Object agent context templates include fields from the assigned layout of the agent's _Primary Object_ and any child or related objects. You can use [Microsoft Word template syntax](/en/lr/796234/#microsoft-word-template-syntax) and [field reference syntax](/en/lr/796234/#word-fo-field-reference-syntax) when modifying the template to reference specific field values and labels.
### Agent Context Field Configuration {#agent-context-field-configuration}
Agent context with document or object fields prompts the agent action to extract the field values and display them in Veeva AI Chat responses. For example, you can use agent context to prompt the _Summarize Document_ action to return the _Name_, _Created Date_, and _Last Modified Date_ of a document the user is viewing in Vault. You can also use agent context to return field values from related and child records in a _Summarize Record_ action.
Click **Generate Default** to display a template you can use to add fields to the agent context. Document agent context templates include fields from the agent's selected _Document Type_ and those available on the Doc Info page. Object agent context templates include fields from the assigned layout of the agent's _Primary Object_ and any child or related objects. You can use [Microsoft Word template syntax](/en/lr/796234/#microsoft-word-template-syntax) and [field reference syntax](/en/lr/796234/#word-fo-field-reference-syntax) when modifying the template to reference specific field values and labels.
Note: If the MAXROWS clause is used in a ${Rowset()} in the document or object field configuration, it can only return up to 2,000 records. If MAXROWS is not used, up to 25 related object records are returned.
 #### Object Agent Context Example {#object-agent-context-example}
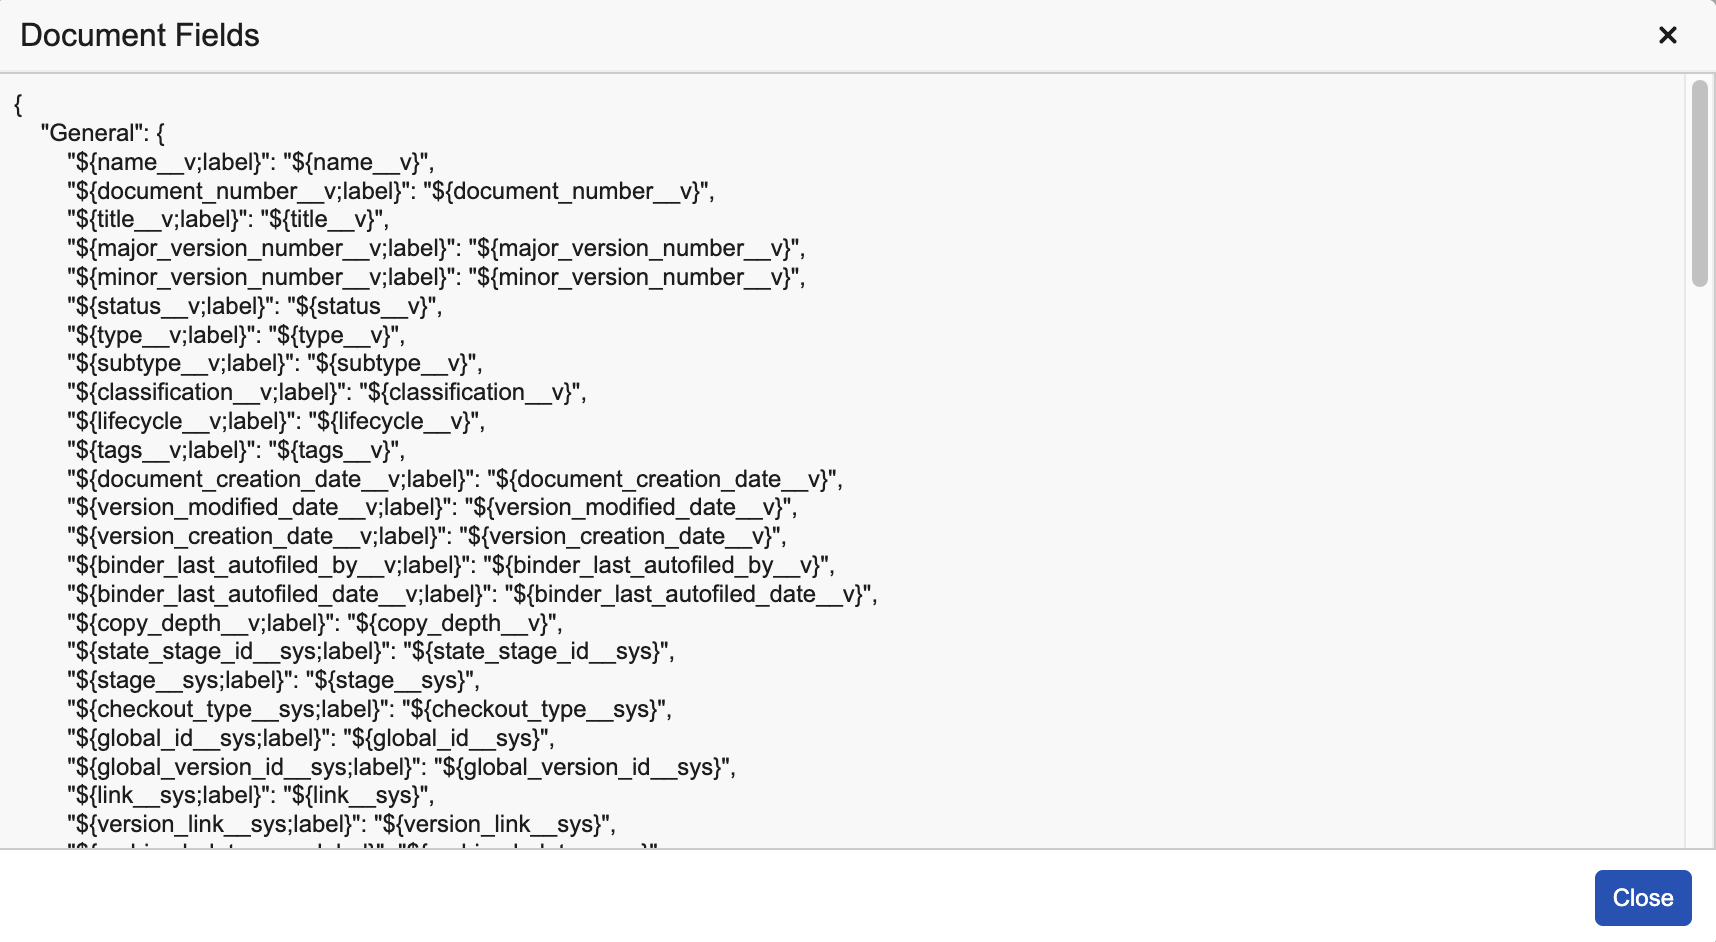
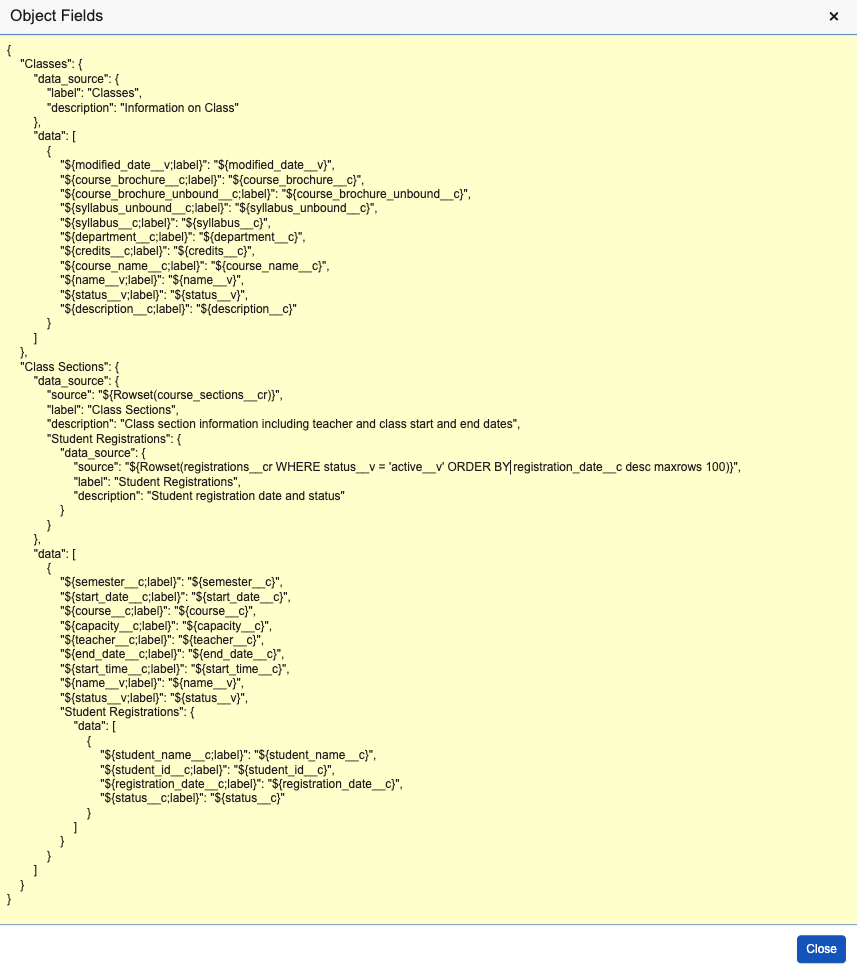
 You can use the template to access child and grandchild records. For example, _Class Section_ is a child of _Class_, and _Student Registration_ is a child of _Class Section_. In this case, the template would appear as displayed in the image below.
In this example, a `WHERE` clause is used in the `${Rowset()}` syntax to filter out inactive records as this syntax returns both active and inactive records by default.
You can use the template to access child and grandchild records. For example, _Class Section_ is a child of _Class_, and _Student Registration_ is a child of _Class Section_. In this case, the template would appear as displayed in the image below.
In this example, a `WHERE` clause is used in the `${Rowset()}` syntax to filter out inactive records as this syntax returns both active and inactive records by default.
Note: You can reference the following fields in agent objectives, agent actions, and document and object agent context fields using Microsoft Word template syntax:
user__sys.username__sysuser__sys.name__vuser__sys.first_name__sysuser__sys.last_name__sysuser__sys.language__sysuser__sys.locale__sys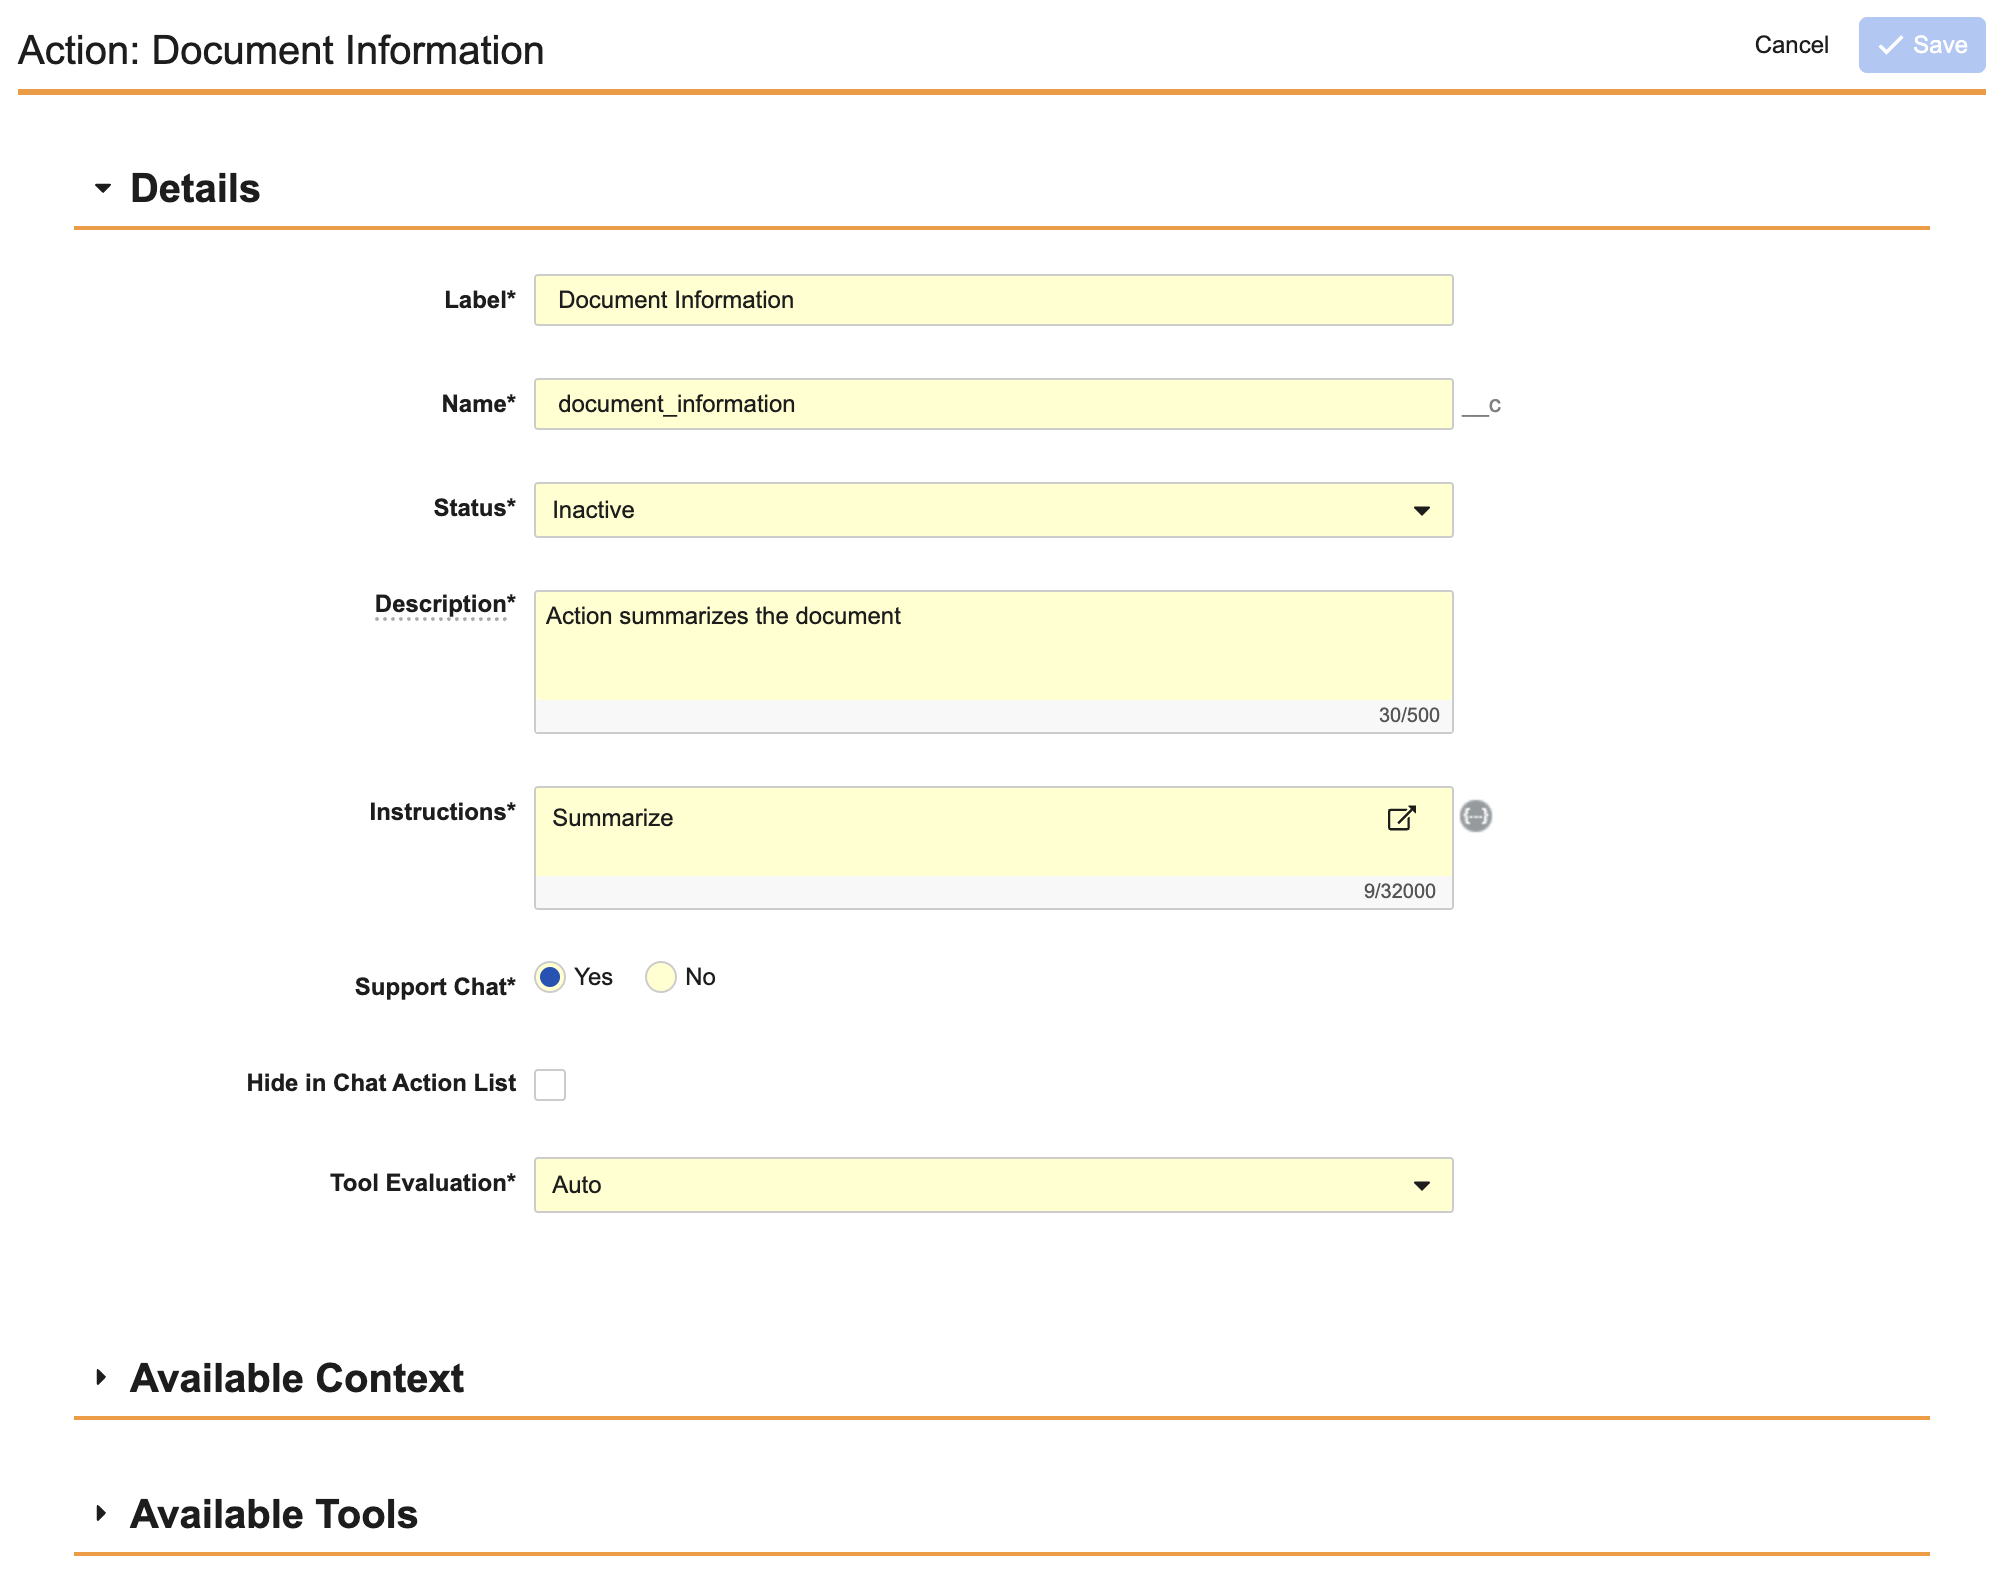 ### Writing Agent Action Instructions {#write-agent-action-instructions}
When writing the agent action's instructions, you can use simple instructions, such as "Summarize document" or slightly more complex details that define the structure of the agent action's response. For example, if you are configuring a _Summarize Document_ agent action, your instructions could prompt the agent action to respond with a header for a one-line summary, specific document metadata, and related documents.
To reference field values from the primary object, related objects, or documents, use Word formatted output [field reference syntax](/en/lr/796234/#word-fo-field-reference-syntax).
### Adding Agent Context and Tools to an Action {#add-agent-context-tool-to-action}
You can assign agent context and [agent tools](/en/lr/950647/) to the agent action after it is saved.
To add agent context and agent tools:
1. On the _Agent Action Configuration_ page, click **Available Context** or **Available Tools.**
2. Click **Add**.
3. Select the agent context or agent tool from the dialog.
4. Click **OK**.
The agent action will now operate within the parameters of the agent context and/or agent tool you assigned.
### Writing Agent Action Instructions {#write-agent-action-instructions}
When writing the agent action's instructions, you can use simple instructions, such as "Summarize document" or slightly more complex details that define the structure of the agent action's response. For example, if you are configuring a _Summarize Document_ agent action, your instructions could prompt the agent action to respond with a header for a one-line summary, specific document metadata, and related documents.
To reference field values from the primary object, related objects, or documents, use Word formatted output [field reference syntax](/en/lr/796234/#word-fo-field-reference-syntax).
### Adding Agent Context and Tools to an Action {#add-agent-context-tool-to-action}
You can assign agent context and [agent tools](/en/lr/950647/) to the agent action after it is saved.
To add agent context and agent tools:
1. On the _Agent Action Configuration_ page, click **Available Context** or **Available Tools.**
2. Click **Add**.
3. Select the agent context or agent tool from the dialog.
4. Click **OK**.
The agent action will now operate within the parameters of the agent context and/or agent tool you assigned.
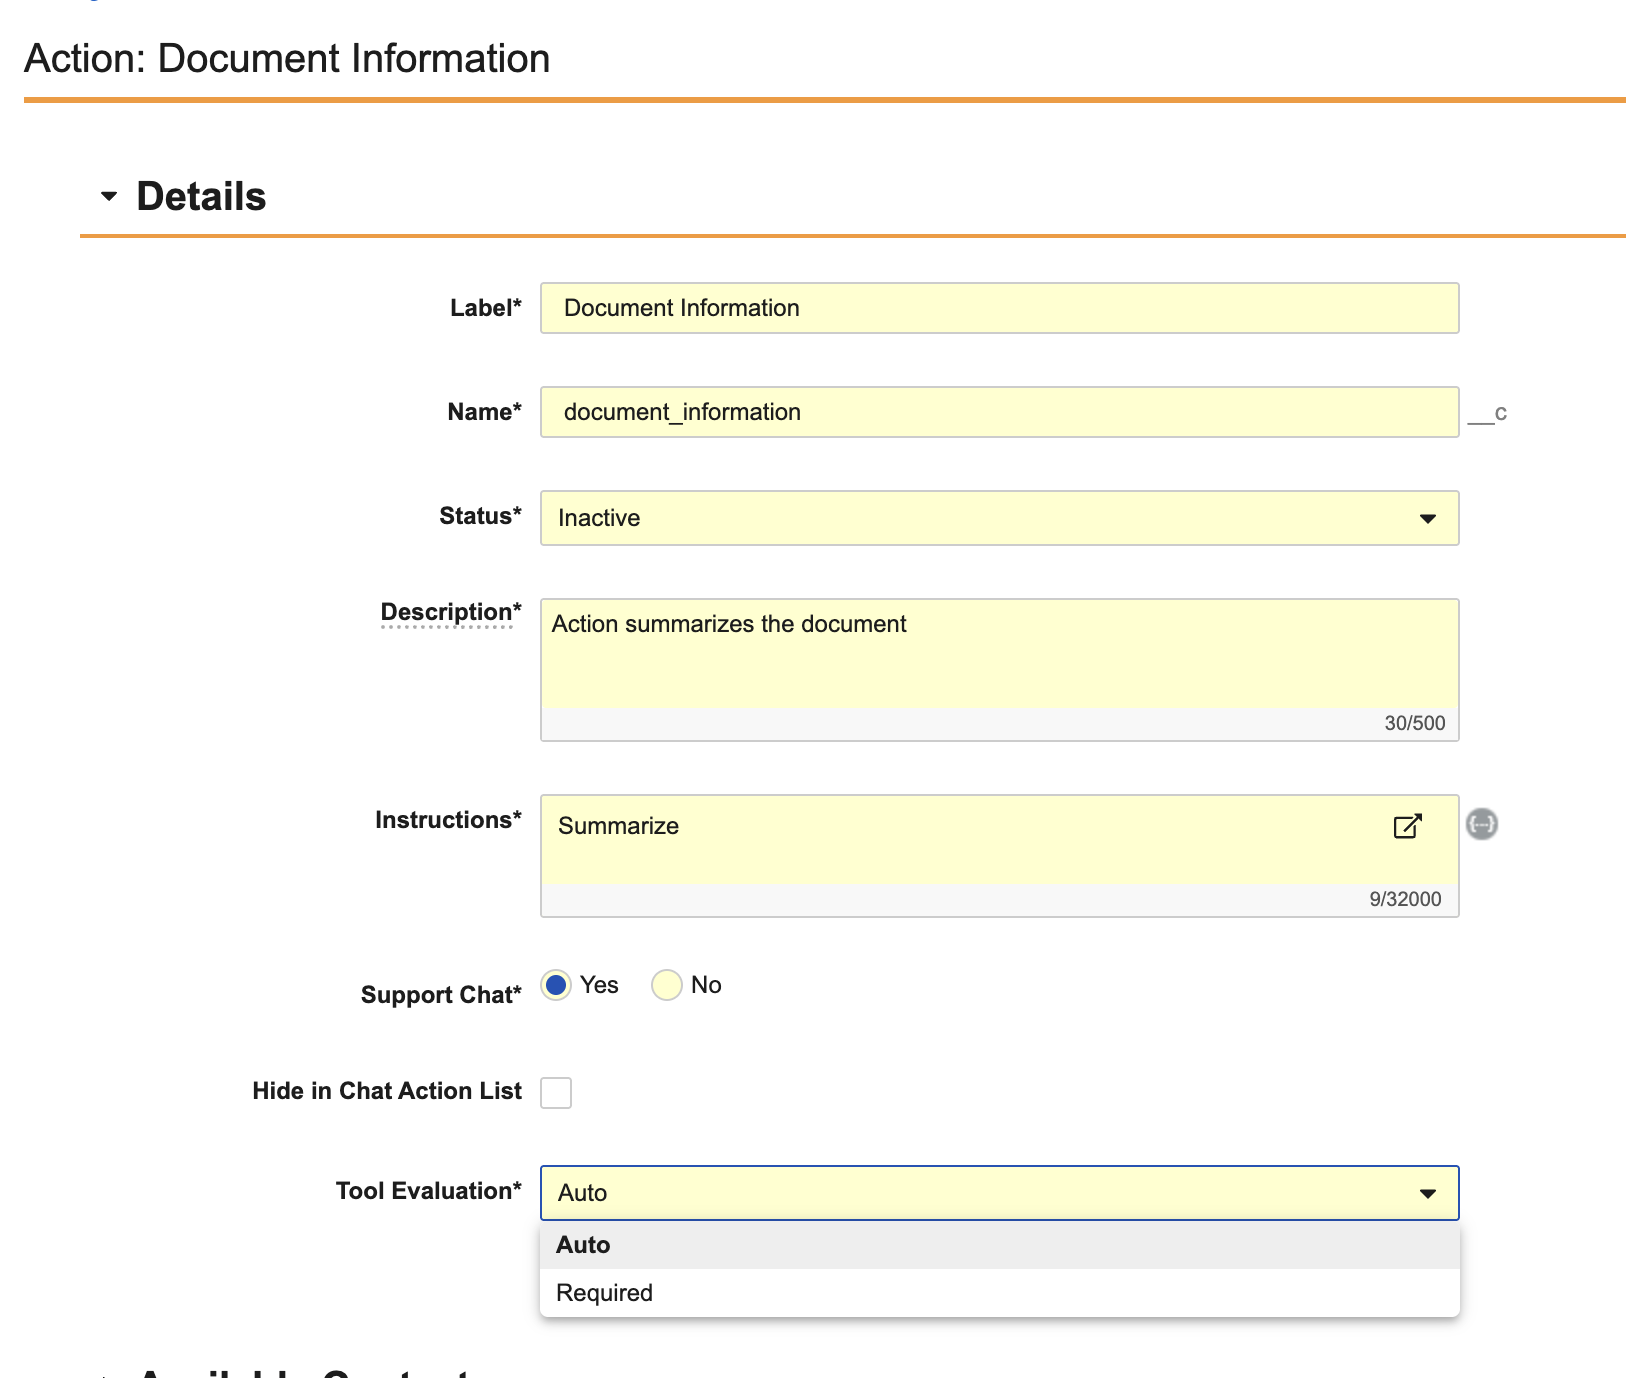
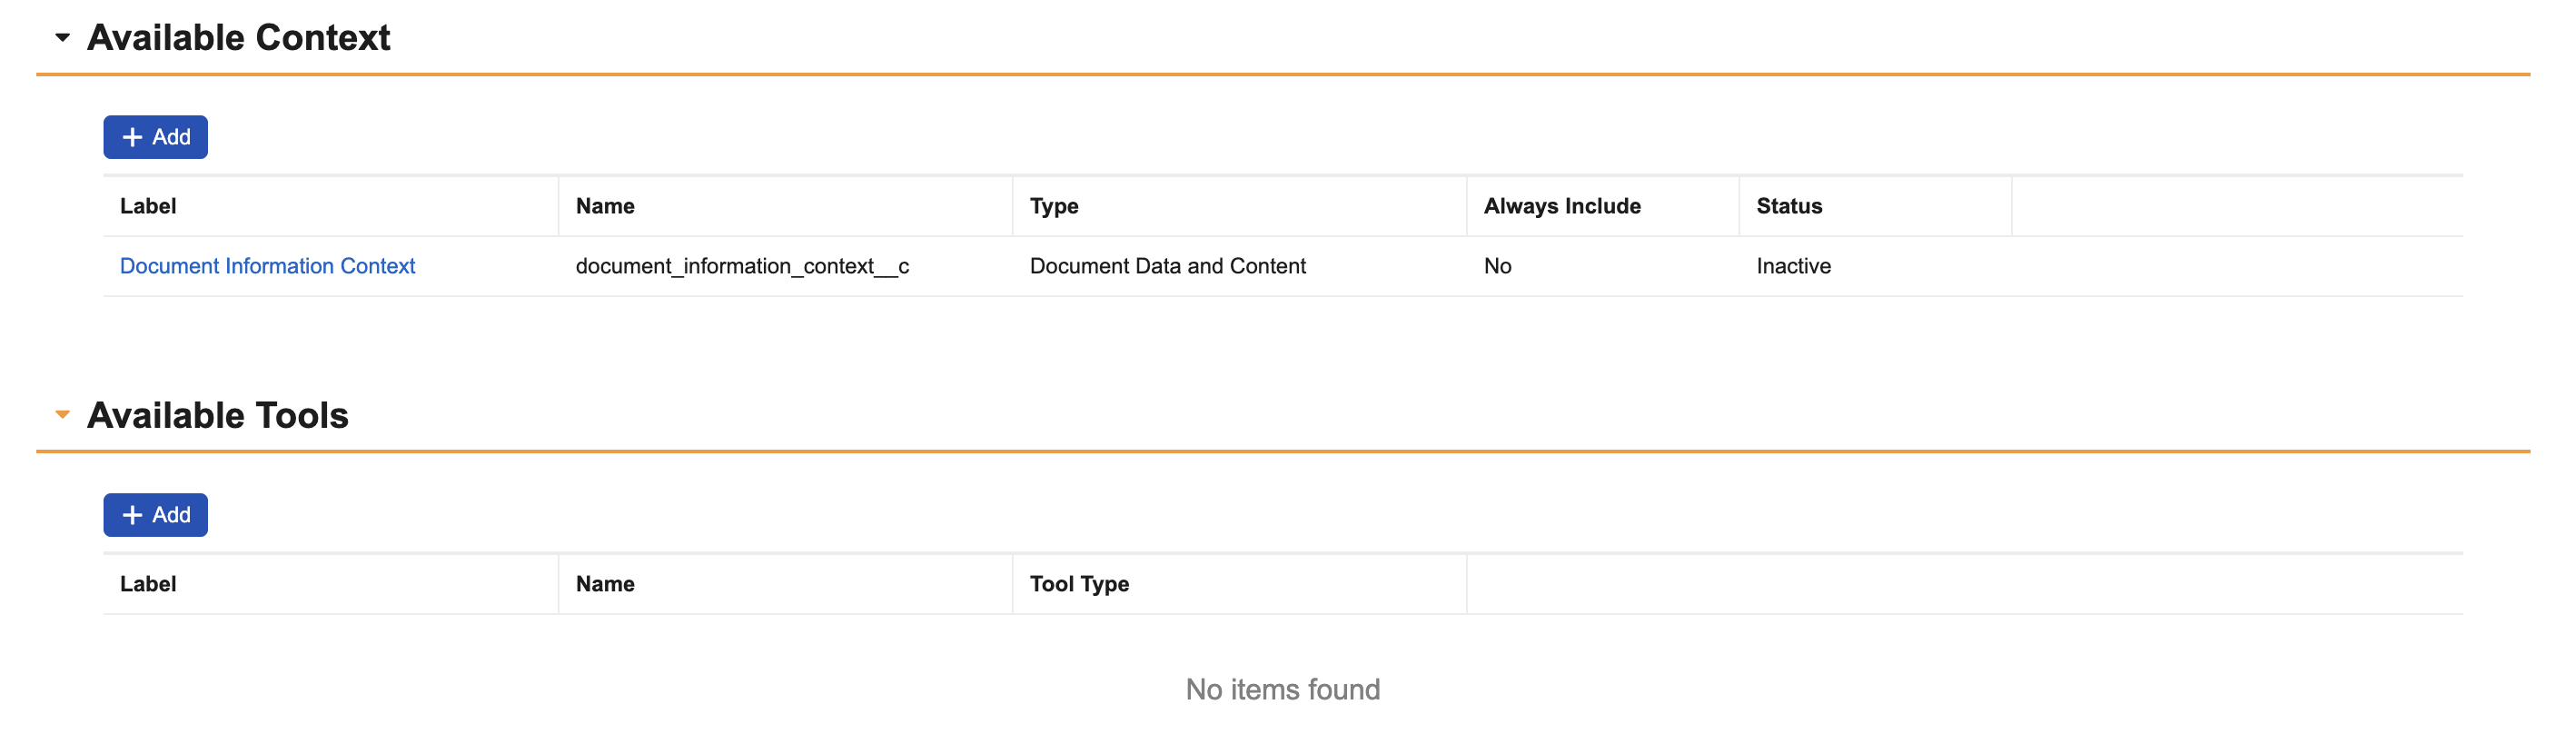 Once the agent action is saved, click **Actions** > **Edit**. Then, in the **Tool Evaluation** drop-down, select **Auto** to allow your LLM to decide when to execute the agent tool. Or, select **Required** to prompt your LLM to use the agent tool each time the agent action is executed.
 ## Limits {#limits}
* You can create up to 500 custom agents per Vault.
* An agent can contain up to 20 agent actions, agent contexts, and agent tools.
* If _Images_ is selected from the _Include Document Content_ drop-down, only the first 20 pages are included.
## Related Permissions {#related-permissions}
The following permissions control your ability to configure agents:
| Type | Permission | Access Details |
| --- | --- | --- |
| Admin | Admin: Agents: Read, Create, Edit, Delete | Ability to view, create, edit, and delete agents. |
| Admin | Admin: Tools: Read, Create, Edit, Delete | Ability to view, create, edit, and delete agent tools. |
| Agents | All Agents: Execute | Ability to select all agent actions within Veeva AI Chat. |
| Agents | [Agent]: Execute | Ability to execute a specific agent and their configured agent actions in Veeva AI Chat. |
| Objects | Agent Instance: Read | Ability to view the _Agent Instance_ object. |
| Objects | Agent Action Execution: Read | Ability to view the _Agent Action Execution_ object. |
| Applications | Vault Actions: Veeva AI Chat: Use Chat | Ability to view and interact with Veeva AI Chat. |
[0]: #configure-custom-llm-connection
[1]: #add-agent-context-tool-to-action
[2]: #set-up-veeva-ai-settings
[3]: #related-permissions
[4]: #configure-agent-context
[5]: #agent-context-field-configuration
[6]: #configure-agent-action
[7]: #write-agent-action-instructions
[8]: #aws-bedrock-connection
[9]: #test-agent-context-output
[10]: #agent-users
[11]: #configure-custom-agent
## Limits {#limits}
* You can create up to 500 custom agents per Vault.
* An agent can contain up to 20 agent actions, agent contexts, and agent tools.
* If _Images_ is selected from the _Include Document Content_ drop-down, only the first 20 pages are included.
## Related Permissions {#related-permissions}
The following permissions control your ability to configure agents:
| Type | Permission | Access Details |
| --- | --- | --- |
| Admin | Admin: Agents: Read, Create, Edit, Delete | Ability to view, create, edit, and delete agents. |
| Admin | Admin: Tools: Read, Create, Edit, Delete | Ability to view, create, edit, and delete agent tools. |
| Agents | All Agents: Execute | Ability to select all agent actions within Veeva AI Chat. |
| Agents | [Agent]: Execute | Ability to execute a specific agent and their configured agent actions in Veeva AI Chat. |
| Objects | Agent Instance: Read | Ability to view the _Agent Instance_ object. |
| Objects | Agent Action Execution: Read | Ability to view the _Agent Action Execution_ object. |
| Applications | Vault Actions: Veeva AI Chat: Use Chat | Ability to view and interact with Veeva AI Chat. |
[0]: #configure-custom-llm-connection
[1]: #add-agent-context-tool-to-action
[2]: #set-up-veeva-ai-settings
[3]: #related-permissions
[4]: #configure-agent-context
[5]: #agent-context-field-configuration
[6]: #configure-agent-action
[7]: #write-agent-action-instructions
[8]: #aws-bedrock-connection
[9]: #test-agent-context-output
[10]: #agent-users
[11]: #configure-custom-agent