This QMS feature allows Admins to configure user actions, entry actions, and workflow steps which create a document based on data from a Quality object record. These documents are created from Adobe or Word formatted output templates, Document Templates, Reports, or from a record’s layout, and are saved into Vault, allowing complex configurations and data from reports or multiple related records to be brought into the generated document. Documents created by this function inherit Vault Document metadata from the starting record, are added to the Library, and are linked to the record from which they were generated.
Using Quality Document Generation
Users start document generation by using a configured user action, by causing the object record to change to a state with a configured entry action, or by including a configured job step in a workflow. Documents generated via entry actions and workflow job steps are created by the System user. Note that while the document generation feature creates content as the System user, the Owner of the content is set as per the configuration of the action or job itself, once the content is created.
As Quality document artifacts can include large amounts of data from many records, this operation can take some time to complete. Once generated, the document is linked in a document reference field on the object record. The name of the generated document is the document reference field label plus the quality object record name, for example, “Related Document – QE000001”. Names follow the configuration specified for the type of document being created, so this filename can be overridden to match your Vault’s naming schemas.
When generating the document, Vault transfers field data for fields with matching names and data types from the originating object record to fields on the newly created document. This transfer matches field names without their extension, for example, __c or __v, prioritizing the standard field (__v) if there is more than one matching field with the same name. Matching picklist or object fields must reference the same picklist or object. Vault will not violate required field configurations when generating documents. When generating the document via supported types of document template, Vault can also transfer data to the document via Merge Field functionality.
Supported Objects
The Quality Document Generation actions are supported for all non-system-managed standard objects with an associated lifecycle. Standard objects are those with a __qdm or __v namespace. Quality Document Generation on a workflow step is supported for all non-system-managed standard objects and all custom objects.
Configuration Overview
Setting up the following Vault components ensures you can effectively use the Quality Document Generation feature:
- Configure appropriate document types, set up as desired with lifecycle and workflow configurations appropriate to the types of content you wish to generate, and add the necessary document generation-related fields.
- Configure appropriate security for your document types. We recommend using Dynamic Access Control and matching or custom sharing rules to ensure appropriate users can see generated documents.
- Configure document generation to begin on a lifecycle state or workflow step:
- Configure the document generation user or entry action, and ensure that the new document will have an appropriately-defined Owner.
- Configure document generation on a workflow job step to generate documents from a Word formatted output template or record layout.
Configuring the Document Type
Document generation relies on the use of the Generate Document From Formatted Output, Generate Document From Report, and Generate Document From Document Template actions, or a job step configured on a workflow. The actions or job cannot execute if there are blank required fields on the selected document type. Ensure that any required document fields are populated via default values or otherwise before generating the document.
When generating documents, Vault populates only required document fields with data from the originating object record. If a field behaves as required due to a field dependency, Vault does not include it in the data transfer.
Ensure your Quality object configuration has an appropriate document reference field whose value can be set to the generated document.
Configuring the Document Generation Actions
To make document generation actions available, you must configure them as user actions or automate them as entry actions in your object lifecycle. They are available for configuration in any state of the applicable objects’ lifecycles.
As Quality document artifacts can include large amounts of data from many records, this operation can take some time to complete. Carefully consider where in your processes’ lifecycles to invoke or allow these actions.
While the configured action automatically determines a document Owner, you can use Dynamic Access Control to grant access to other roles as necessary. We encourage planning and testing to ensure that the actions configured for generating these documents perform as expected.
Configuring the Generate Document from Formatted Output Action
Before configuring this action, a Business Admin must first create an Adobe formatted output template or a Word formatted output template for the required object. Documents created with a Word formatted output are generated asynchronously. When users create a document for the first time using the Generate Document from Formatted Output action, QMS creates a placeholder and updates the document to the next minor version once the viewable rendition is uploaded. If the action is configured as an entry action, users will receive an error notification based on the entry action configuration if the action encounters errors. We recommend taking this processing behavior into consideration during configuration and ensure that users review documents before moving a record to the next lifecycle state.
To include the Reason for Change History section in a document generated from a Word formatted output template, include the following token in the template:
${GetContent(com.veeva.vault.app.quality.qms.reasonforchange.contentgenerator.ReasonForChangeContentGenerator)}
To configure this action, complete the following steps:
- In the User Actions or Entry Actions section of the applicable object lifecycle state details page, click Edit.
- Select Always or Perform with conditions as appropriate for your process.
- Select the Generate Document From Formatted Output action from the drop-down.
- Select a Document Type. You can choose from any document type in your Vault. During initial setup, it may be helpful to select a simple document type with few or no required fields for testing purposes.
- Select the Document Lifecycle for the document type.
- Select an Object Reference Field on Document. After the action executes, Vault populates this field with a link back to the originating record.
- If configuring the user action, select from the Available Formatted Outputs to use when generating the document.
- Optional: If configuring the user action, select a Default Formatted Output. When a user performs the action, this output is the default template in the dialog.
- If configuring the entry action select a formatted output from the Template drop-down.
- Select a Document Reference Field. The selection is limited to outbound document reference fields available on the lifecycle’s object. After the action executes, this field is populated with a link to the new document.
- In the Populate Owner From drop-down, select either From User Field or From Quality Team Role. See the details below.
- Optional: Select Application Roles from the Populate Users for the following Application Roles drop-down. See the details below.
- Optional: If configuring the entry action, define which roles on a record should receive a completion notification when documentation generation is complete via the Action Completion Notification Recipients field. If a user is manually assigned to any of the identified roles through Quality Teams or directly through Sharing Settings, those users receive the completion notification. Users assigned to roles automatically using a Dynamic Access Control configuration will not receive completion notifications.
- If configuring the user action, enter an Action Label.
- Click Save.
Note: The Generate Document from Formatted Output action runs using a System account, not as the user that executed the user action or the state change that triggered the entry action.
Configuring the Generate Document from Document Template Action
To configure this action:
- In the User Actions or Entry Actions section of the applicable object lifecycle state details page, click Edit.
- Select Always or Perform with conditions as appropriate for your process.
- Select the Generate Document From Document Template action from the drop-down.
- Select a Document Type. You can choose from any document type in your Vault. During initial setup, it may be helpful to select a simple document type with few or no required fields for testing purposes.
- Select the Document Lifecycle for the document type.
- Select an Object Reference Field on Document. After the action executes, Vault populates this field with a link back to the originating record.
- If configuring the user action, select from the Available Document Templates to use when generating the document. You can select from any document template that is associated with this document type.
- If configuring the entry action, select a Document Template from the drop-down.
- Optional: If configuring the user action, select a Default Document Template. When a user performs the action, this template is the default template in the dialog.
- Select a Document Reference Field. The selection is limited to outbound document reference fields available on the lifecycle’s object. After the action executes, this field is populated with a link to the new document.
- In the Populate Owner From drop-down, select either From User Field or From Quality Team Role. See the details below.
- Optional: Select Application Roles from the Populate Users for the following Application Roles drop-down. See the details below.
- If configuring the user action, enter an Action Label.
- Click Save.
Configuring the Generate Document from Report Action
- In the User Actions section of the applicable object lifecycle state details page, click Edit.
- Select Always or Perform with conditions as appropriate for your process.
- Select Generate Document From Report from the drop-down.
- Select a Document Type. You can choose from any document type in your Vault. During initial setup, it may be helpful to select a simple document type with few or no required fields for testing purposes.
- Select the Document Lifecycle for the document type.
- Select an Object Reference Field on Document. After the action executes, Vault populates this field with a link back to the originating record.
- Select your Report Type from the drop-down.
- Select an Available Report view from the drop-down.
- Optional: Select a Default Report. When a user performs the action, this output is the default template in the dialog.
- Select a format to export to from the Report Export Type drop-down. Choose from CSV, Excel, Excel template, or PDF.
- Select a Document Reference Field. The selection is limited to outbound document reference fields available on the lifecycle’s object. After the action executes, this field is populated with a link to the new document.
- In the Populate Owner From drop-down, select either From User Field or From Quality Team Role. See the details below.
- Optional: Select Application Roles from the Populate Users for the following Application Roles drop-down. See the details below.
- Enter an Action Label.
- Click Save.
About Document Generation Actions After Vault Provisioning by Cloning
If Veeva Product Operations clones your Vault after you have configured the document generation actions, you may need to reconfigure the action in the new Vault as the nature of the document templates and reports may have changed.
Configuring Document Generation on a Workflow Step
You can configure Vault to generate a document when a record reaches a workflow job step. This is commonly used in configurations where the generated document must be available for use by automation or users before a record enters a certain state. Using this configuration, Vault can generate either a Word formatted output document or a document that reflects the data and layout of an object record at the time of document generation.
To configure document generation on a workflow step:
- Create a Word formatted output template if you need to generate a formatted output document. Documents created with a Word formatted output are generated asynchronously.
- Create a job definition that will be referenced in the workflow configuration.
- Configure a job step on the relevant object workflow.
- Optionally configure a decision step on the relevant object workflow to prevent a quality process from moving forward until document generation is completed.
Creating a Job Definition
To configure document generation on a workflow step, you must first define a job that will later be referenced in a workflow job step configuration. You can reuse this job definition across workflow step configurations. You must configure one job definition per document type you wish to create with a document generation workflow step.
To create a job definition:
- Navigate to Admin > Operations > Job Definitions and click Create.
- Enter a Title.
- Update the Status to Active.
- Under Type, select SDK Job.
- Under Job Owner, select the Vault user the job will execute as. This user must have the required permissions to create the document.
- Under Schedule, select Once.
- Clear the Auto Complete Workflow Step checkbox. If this checkbox is selected, document generation fails.
- In the SDK Job Configuration section, select the following Job:
com.veeva.vault.app.quality.qms.generatedocfromrecord.job.GenerateDocumentWorkflowJob (Generate Document from Workflow Job) - Select an Object and, if applicable, an Object Type. This must be an object that has Dynamic Access Control enabled.
- Select the method of document generation from the Generate Document From drop-down:
- Record Layout: Vault generates a document that is a snapshot of the record at the time of document generation.
- Word Formatted Output: Vault generates a document from a Word formatted output template specified in the job definition.
- Select a Document Type. You can choose from any document type in your Vault. During initial setup, it may be helpful to select a simple document type with few or no required fields for testing purposes.
- Select the Document Lifecycle for the document type.
- Select an Object Reference Field on Document. After the document is generated, Vault populates this field with a link back to the originating record.
- If generating a document from a formatted output template, select a Template.
- If generating a document from a record layout:
- Select an Orientation to specify if the generated document should be portrait or landscape.
- Select the appropriate Record Layout. All active layouts for the target object and object type are available to select.
- Select a Document Reference Field on Object. The selection is limited to outbound document reference fields available on the target object. After the job executes successfully, Vault populates this field with a link to the generated document.
- In the Populate Owner From drop-down, select either From User Field or From Quality Team. See the details below.
- Optional: Select Application Roles from the Populate Users for the following Application Roles drop-down. See the details below.
- Select Action Completion Notification Recipients. These are the users to be notified when the document generation job encounters errors. If a user is manually assigned to any of the identified roles through Quality Teams or directly through Sharing Settings, those users receive the completion notification. Users assigned to roles automatically using a Dynamic Access Control configuration will not receive error notifications. The Viewer and Editor roles are not available to select.
- Optional: Select the Transition Document to Steady State Upon Completion checkbox to automatically move the generated document to a steady state.
- Click Save.
Configuring a Workflow Job Step
After creating the job definition, you must add a job step to a supported object’s workflow that references the document generation job definition. This triggers document generation to begin at the appropriate moment in a process, and halts the workflow until that generation is completed. As a best practice, we recommend the use of a job step in conjunction with a decision step that captures the success or failure response from the step’s execution, allowing you to route any failure cases to users for remediation.
To configure document generation on a workflow job step:
- At the appropriate point in the target object workflow, create a job step.
- Enter a Label for the step.
- Select Job as the Type.
- For Next Steps, do one of the following:
- If your process requires verifying that document generation was successful, create a placeholder step that will be a decision step to branch the workflow depending on the outcome of the document generation job. See below for more information.
- If your process does not require verifying that document generation was successful, enter the next step in the workflow.
- Under Job Options, select the job definition you created from the Vault Job drop-down.
- Enter a Timeout Period. If a document is not successfully generated within the specified timeframe, the job is cancelled.
- Click Save.
- On the main configuration page for the workflow, click Make configuration active.
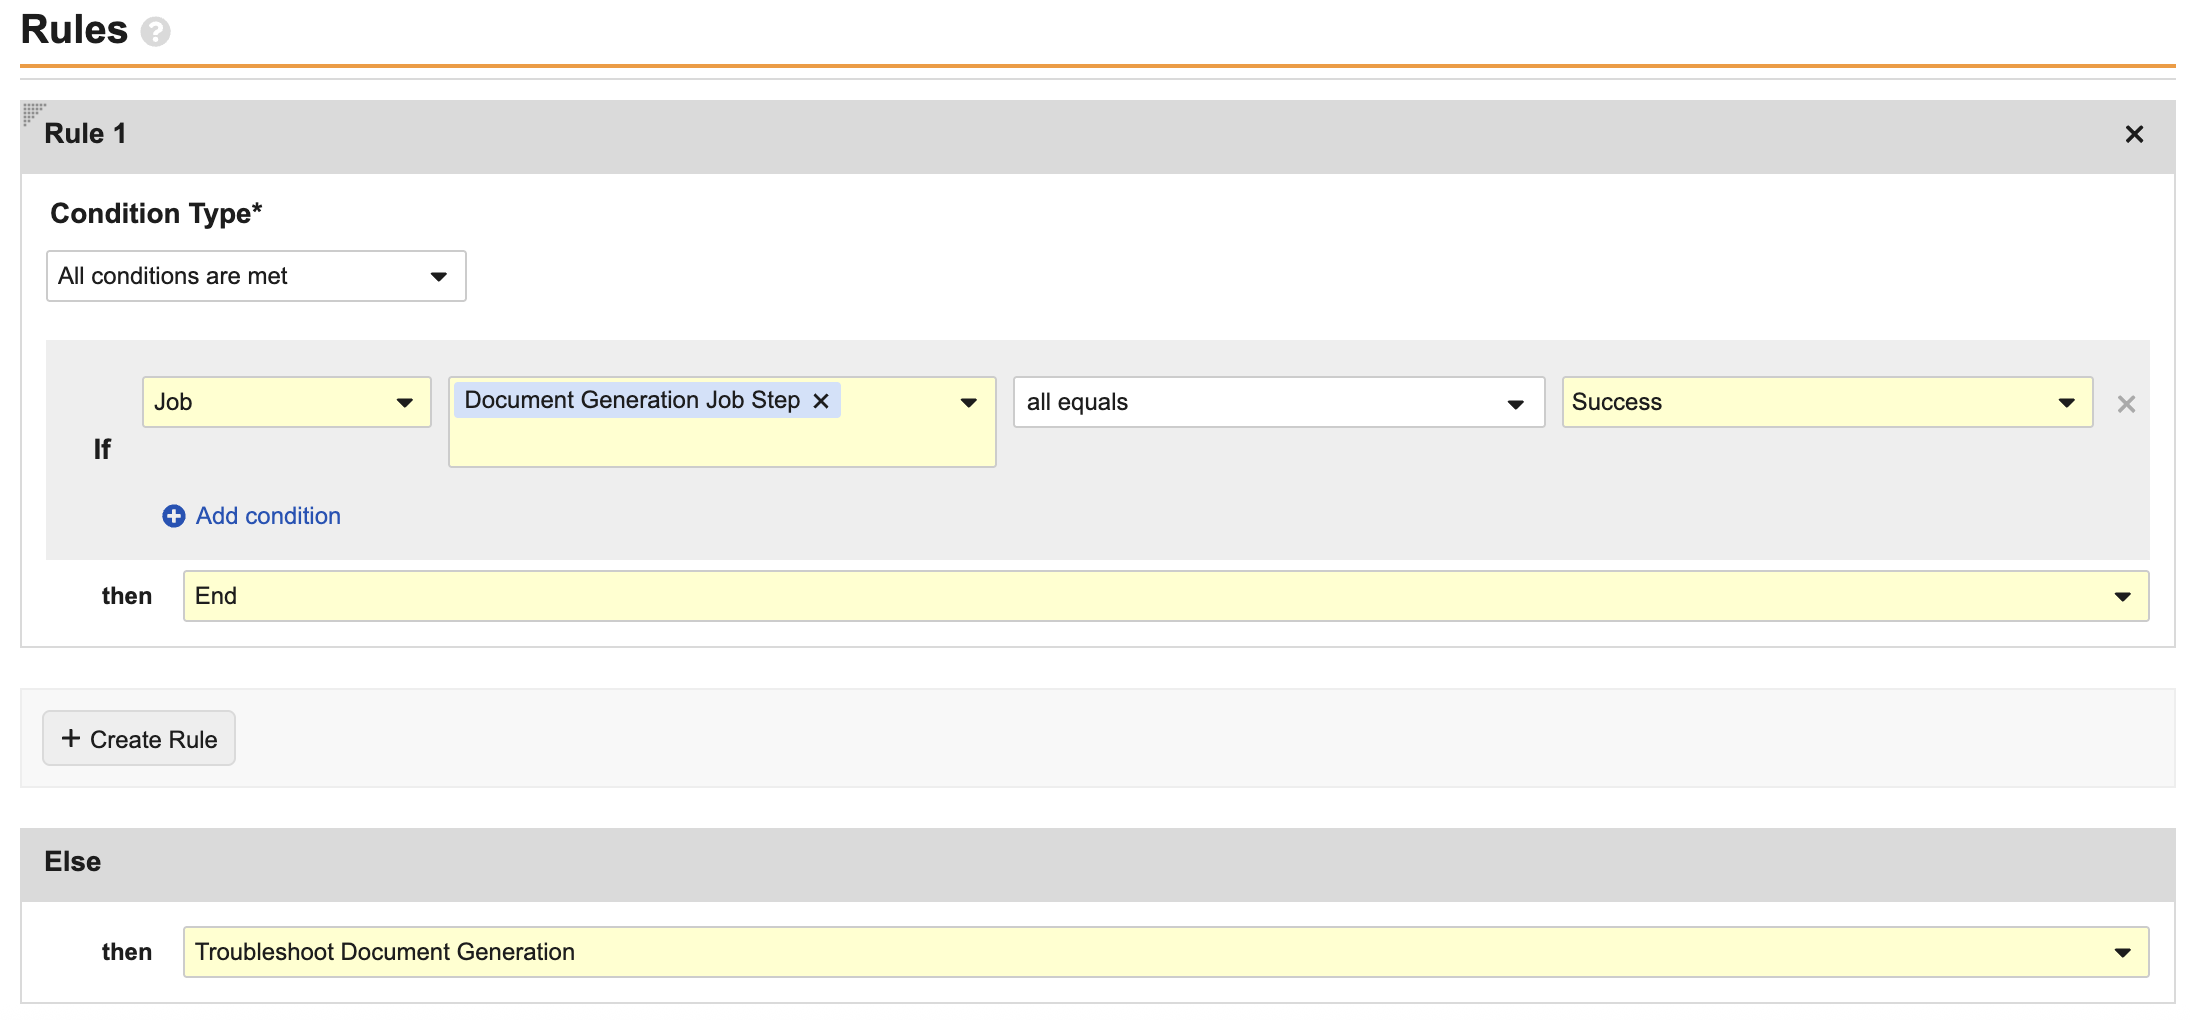
Configuring a Workflow Decision Step
You can optionally configure a decision step after the job step in order to branch the workflow depending on the outcome of the document generation job. In scenarios where document generation is essential to a process, this configuration puts the process on hold and prevents the record from moving into the next state until document generation completes successfully.
To configure a decision step:
- Navigate to the placeholder step you created during step 4 of configuring the job step.
- Click Edit.
- Update the Type to Decision.
- Create next steps depending on the outcome of the document generation job. See the screenshot below for an example configuration.
- Click Save.
- Finish configuring the next steps as needed.
About Document Role Population Options
The following options are available on lifecycle and workflow document generation configurations.
Populating the Document Owner
The Populate Owner From drop-down determines which user to place in the Owner role on the generated document once it is created. Select either From User Field or From Quality Team Role. The From User Field option adds a user from the selected User object reference field on the object. To use this option, a User reference field must be configured on the object. Once configured, this User reference field can be set as a Linked Field to a Quality Team Role with a max of one user, or populated manually
The From Quality Team Role option populates the Owner role with a Quality Team member from the selected Quality Team and Quality Team Role. The Quality Teams and roles presented allow selection from any Team associated to any type of this object. Choose only the team that is in use by the type of record for which this action will be applicable. Only Quality Team Roles with a maximum of one user may be used for this purpose.
Populating Application Roles
The Populate Users for the following Application Roles drop-down determines which users to place in the relevant roles on the generated document once it is created. The available roles are limited to those which are shared between the current object lifecycle and selected document lifecycle. The roles must be active and populated in the originating record for actions to complete successfully.
Note: When populating Application Roles, Vault only selects users assigned manually via a record’s Sharing Settings, object workflow actions, or Quality Team selection. Vault does not populate users assigned to a role via matching or custom sharing rules.