The QMS Risk Builder tool allows you to easily and quickly enter data for Assessment Risks in a specialized section on an Assessment object details page.
The Risk Builder tool must be enabled by an Admin.
Adding Assessment Risks to a Risk Assessment
You can add Assessment Risks by following the steps below, or by running the Create Risks from Existing Assessment action.
- Navigate to Business Admin > Objects > Assessment, or to a custom object tab, and click into an Assessment record.
- Ensure the Assessment record has at least one Process Step record defined.
- In the Assessment Risks section, click Risk Builder. The Assessment Risks section may appear only in certain Assessment lifecycle states, depending on the configuration of your Vault.
- Select a Process Step. This selection filters your view to only those existing Assessment Risks associated with the selected step.
- Click the edit icon .
- Using the navigation and editing tools, add data to existing risks or create new ones.
- Once satisfied with your changes, click Save to keep your changes or click Cancel to leave editing mode. If you left any fields blank that are required on the Assessment Risk object, or the data you entered does satisfy any of the validation rules defined for the Assessment Risk object, Vault will mark the problem fields and prompt you to fix the issues.
- Repeat steps 3-6 for your other Process Steps as needed.
- Click Close to return to the Assessment record detail page.
Creating Risks from an Existing Assessment
If available, you can run the Create Risks from Assessment action from an Assessment record or from the Risk Builder to create up to 1,000 Assessment Risks at once by copying key information from existing Assessment Risks associated with a different Assessment. To run the action, select it from the Actions menu of the Risk Builder while in view mode.
This action is available for Assessments of all custom and standard object types, excluding the Risk Factor object type. The object types of the source and target Assessments must match exactly. The object type must also match between the source and target Assessment Risk and the source Assessment.
When you create Assessment Risks this way, Vault:
- Associates the created Assessment Risks with existing FMEA Process Steps in the target Assessment that have the same Step Short Name or Name field values as the FMEA Process Step associated with the source Assessment Risk. If no matching FMEA Process Step exists, Vault creates a FMEA Process Step and copies key information from the FMEA Process Step associated with the source Assessment Risk. Depending on your Admin’s configuration, Vault may create Assessment Risks without associating them to FMEA Process Steps.
- Associates the created Assessment Risks with Hazards in the target Assessment using the same logic as for FMEA Process Steps.
- Populates all existing or configured default values for standard and custom fields from the source Assessment Risk to the target Assessment Risk, unless these fields have the Do not copy this field in Copy Record attribute enabled.
- Sets the Assessment Order of created Assessment Risks as the last risk in a FMEA Process Step, or, if the risk does not have FMEA Process Steps, to the last risk in the Assessment.
- Populates the Source Assessment and Source Risk fields on the created Assessment Risk. The Source Risk value must be unique among Assessment Risks within an Assessment.
- Populates the Risk Matrix field of the created Assessment Risks with the same risk matrix used by the target Assessment.
Vault does not copy the following information when creating Assessment Risks:
- Any risk scores and Risk Matrix-related fields, because the source and target Assessments do not need to use the same Risk Matrix
- Required fields without configured default values
- Documents associated with the Assessment Risk
- Mitigations
Adding Documents to an Assessment Risk
You can view documents associated with an Assessment Risk and associate documents to an Assessment Risk from the Risk Builder. The Assessment Risk Documents column may be available by default, or you can add it while in view mode by selecting Edit Columns from the Risk Builder’s Actions menu.
When the Risk Builder is in view mode, if an Assessment Risk has associated documents, you can click View Assessment Risk Documents in a cell in the Assessment Risk Documents column to open a dialog that displays a list of all documents associated with an Assessment Risk. Click on a document in the dialog to open it in a new window.
When the Risk Builder is in edit mode, you can click the (+) icon to add documents, or, if associated documents already exist, you can click Edit Assessment Risk Documents in a cell in the Assessment Risk Documents column to open a dialog that lets you search for documents to add to or remove from the Assessment Risk. You can associate up to ten documents to a single Assessment Risk. The Assessment Risk Documents column is not available in reorder mode.
If your Vault uses the Periodic Risk Review feature to automatically create Assessment Risk History records for each risk when an Assessment is approved, Vault now captures the specific version of each risk’s linked documents when Vault generates the Assessment’s history in the Assessment Risk History records.
About the Risk Builder Interface
The Risk Builder is a flexible interface that allows for multiple methods of data entry while creating and editing Assessment Risks. Each cell in the Risk Builder represents a piece of field data on an Assessment Risk record.
View Mode
Clicking Risk Builder in an Assessment record opens the Risk Builder in view mode, from which you select a Process Step to filter the view. You can click the binoculars icon to quickly search for a Process Step. After selecting a step, the Risk Builder’s edit mode becomes available.
The Search box allows you to search Vault for Assessment Risks by field data.
Hovering over fields that represent object records displays the record’s hovercard.
From the Risk Builder’s Actions menu in view mode, you can update the columns that display and initiate any available actions.
From the Actions menu of an Assessment Risk record in view mode, you can initiate a user action or view the record’s audit trail.
Reorder Mode
Clicking the Reorder button from the view mode takes you to the Reorder Mode page, where you can reorganize individual risks using drag-and-drop functionality and save your changes.
Assessment Risks are ordered by Name if they are not associated with a Process Step. Assessment Risks associated with a Process Step are grouped by that step and ordered within it by the Risk Order field. As you change the risk order of an Assessment Risk so that it is associated with a new Process Step, Vault automatically adjusts the numbering, changing the Risk Order field of the moved Assessment Risk to a new Risk Order of zero (0). This ensures that the risk is easy to locate after reorganization.
Users can view the first four columns set in the Risk Builder view in Reorder mode.
Edit Mode
Click the edit icon to enter the Risk Builder in edit mode. In this mode, you can add new risks and update information for existing risks.
Adding & Removing Rows
You can add new risks by clicking + Row or by pressing the Ctrl + Enter keys while editing the last row in the list. To update the table rows, click the Actions menu next to an Assessment Risk and perform one of the following actions:
- Insert Row Above: Inserts a blank row above the selected row.
- Insert Row Below: Inserts a blank row below the selected row.
- Clone Row: Copies the selected row, and pastes it into a new row just below the selected row. Clone Row is equivalent to performing a Copy Row, followed by Insert Row, and then Paste Row into the newly inserted row.
- Copy Row: Copies the selected row so it can be pasted into another row.
- Paste Row: Pastes the data from the copied row into the selected row.
- Delete Row: Deletes the selected row if it has not yet been saved, or if you have permission to delete the Assessment Risk record.
When deleting rows, Vault respects the configured permissions to delete the row. This means inbound related records such as Assessment Risk Mitigation Action (assessment_risk_mitigation__vr) or Quality Team assignments may prohibit deletion if cascade delete for those relationships is not configured. In these cases, we recommend moving the Assessment Risk records to the Cancelled state via the record details page of the Assessment Risk record.
Flagging for Review
You can mark a risk row for review by opening the Actions menu next to an Assessment Risk and selecting the Flag for review action. The total number of rows marked for review is displayed at the top of the builder. You can remove the flag with the Remove flag action.
Risk Builder Keyboard Shortcuts
After clicking on a cell, you can use the following keyboard shortcuts to navigate and edit the grid:
| Shortcut | Function |
|---|---|
| Ctrl + Enter | If not editing a result, puts the cell in editing mode. If currently editing a cell, navigates down a row while remaining in editing mode. If currently editing a cell in the last row, creates a new row and navigates to the first editable cell in the new row. |
| Tab | Navigates to the right across editable cells. Navigates to the next row down if pressed in the last editable cell in a row. |
| Shift + Tab | Navigates to the left across editable cells. |
| Arrow Keys | Navigates between cells while not editing a cell. |
| Esc | When pressed while editing a cell, returns the cell to view mode. |
| Ctrl + C | Copies the content of a cell, or copies the selected portion of a cell while in editing mode |
| Ctrl + X | Cuts the content of a cell, or cuts the selected portion of a cell while in editing mode |
| Ctrl + V | Overwrites the content of a cell, or pastes into the selected portion of a cell while in editing mode |
Filtering
Click the filter icon to add more advanced filters to your view. You can add filters for Assessment Risk metadata such as Created By, Initial Severity, Initial Detectability, Initial Occurrence, Risk Event Type, Assessment Risk Documents, or other columns displayed in Risk Builder. Click the plus (+) icon to the right of the filter row to add additional filters. When you add multiple filters, the Risk Builder only displays the Assessment Risk records that match all filters. Click Apply to view the filtered assignments. Click Clear to remove all filters.
Managing Assessment Risk Mitigations in the Risk Builder
If allowed by your configuration, the Risk Builder allows you to manage mitigations for each Risk via the Assessment Risk Mitigations column.
Adding a Mitigation to a Risk
To add a mitigation to a Risk in the Risk Builder:
- Click the plus (+) icon in the Assessment Risk Mitigations column.
- Select a mitigation type. Depending on your organization’s processes, options may include the Mitigation Action, Change Control, Continuous Improvements, CAPA Action, MedTech CAPA, or Quality Event object.
- In the selection dialog, select one or more records of the chosen type. If a user is allowed to create the selected object, they can also click the Create button in the dialog to create a new one.
- Click Close to return to the Risk Builder.
- Click the X icon on a mitigation to remove it from the column.
Heat Map
The Risk Builder includes a risk visualization tool to allow you to view your Assessment in a heat map format. Click Generate Heat Map to build and view the visualization. The heatmap organizes risks based on the assessment’s two-dimensional (Severity and Occurrence) or three-dimensional (Severity, Occurrence, and Detectability) Risk Matrix.
Each cell in a two-dimensional heat map represents a particular combination of Severity and Occurrence. Cells in a three-dimensional heat map represent a particular combination of Severity, Occurrence, and Detectability. Cells are color-coded to reflect the various Risk Levels defined in the assessment’s Risk Matrix. The count inside a cell identifies the number of Risks within the assessment corresponding to the cell’s Risk Score. You can click a cell to display a list of all the associated Risks with that combination of attributes. The heat map displays risks in descending order along the Y-axis, with the most critical risks with the highest Occurrence and Severity scores displayed at the top of the heat map.
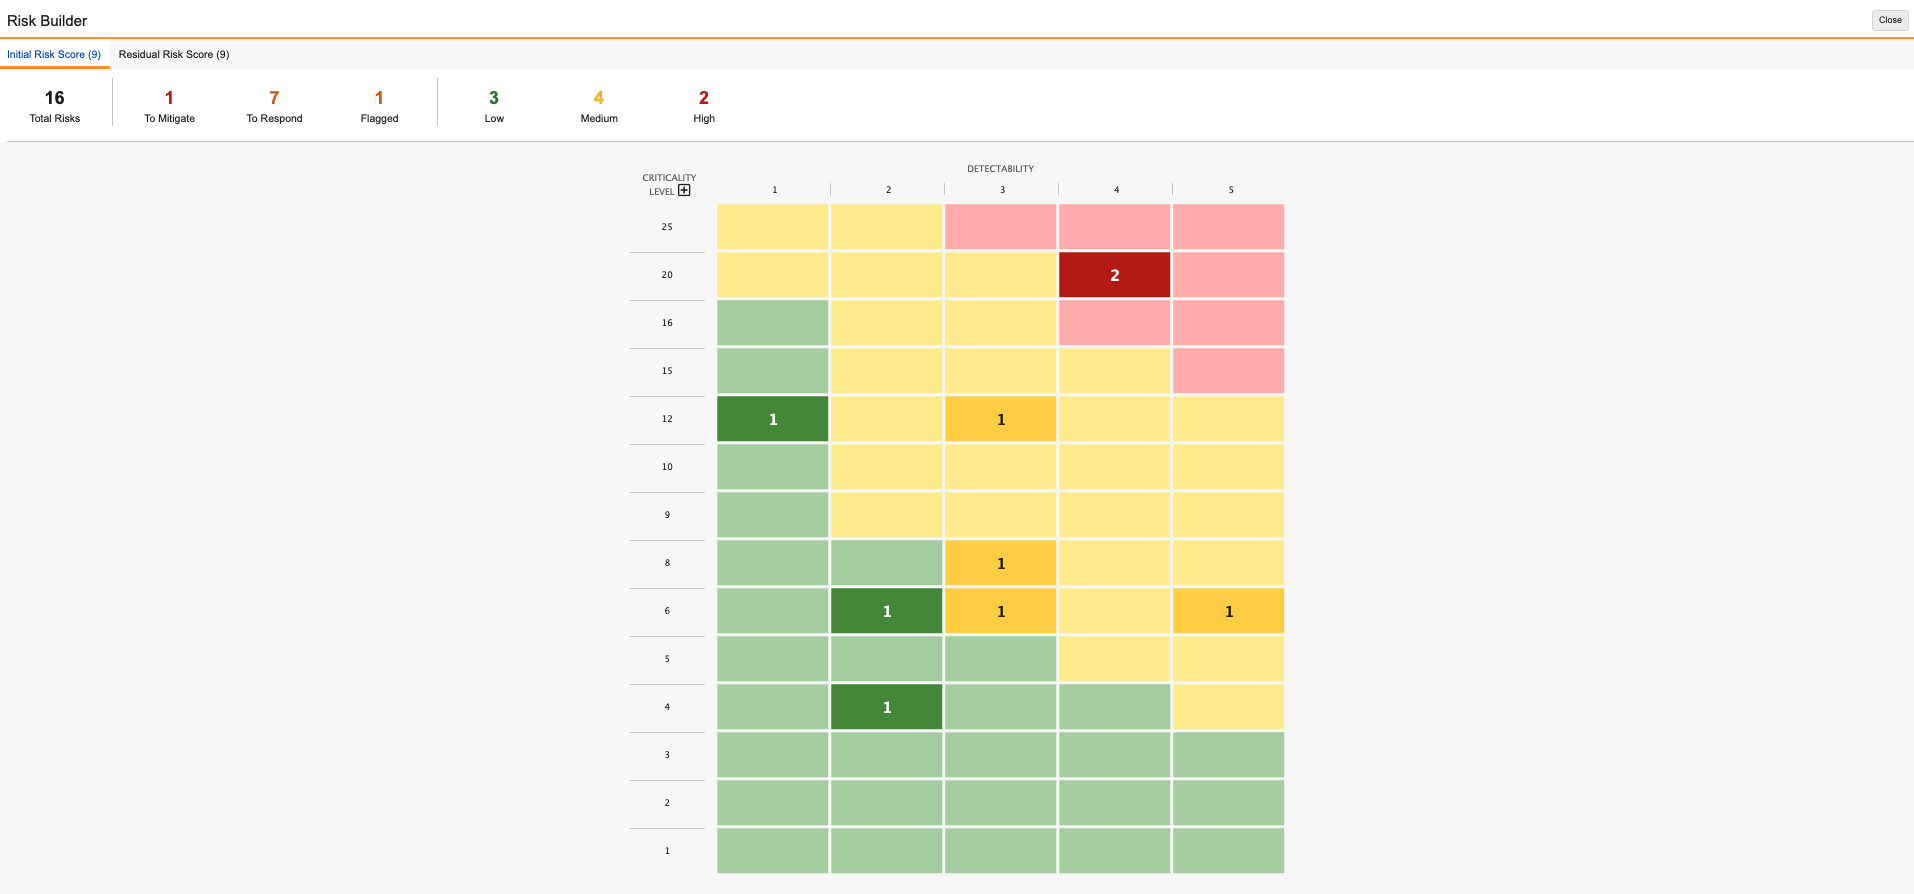
Action Filters
The top bar of the heat map lists clickable built-in filters. Click on one of these filters to navigate to a list of all applicable Risk records:
- Total Risks: All Risks associated with the Assessment.
- To Mitigate: Risks that do not have Mitigation Actions.
- To Respond: Risks that do not have a Risk Response assigned (not shown in screenshot).
- Flagged: Risks that are flagged for review in the record’s Assessment Risk Flag field .
- Risk Levels: Risks in each Risk Level, such as Low, Medium, High, or Extreme.
Two-Dimensional & Three-Dimensional Heat Maps
For a heat map visualization for two-dimensional Risks, with only Severity and Occurrence values, Vault displays the Severity as columns and Occurrence as rows. For three-dimensional Risks, with Severity, Occurrence, and Detectability values, Vault displays Detectability as columns, and the intermediate Criticality values as rows. Click on the Criticality header to expand it to show the contributing Severity and Occurrence values for a given row.
Heat Map Limitations
The Heat Map visualization has the following limitations:
- The Generate Heap Map button is disabled for an Assessment with more than four (4) Risk Levels associated with its Risks.
- Assessments containing greater than 3,000 Risk records display only the 3,000 records with the highest-calculated risk levels.
- The Generate Heap Map button is disabled for Risk Matrices that have incomplete Risk Matrix Setup records (Risk Level or Criticality Levels are not assigned).
- The Generate Heap Map button is disabled for Risk Matrices that use Occurrence and Detectability only, or only one dimension.
Related Permissions
To utilize the reorder mode in the Risk Builder, a user requires Edit permission on the Assessment Risk object records that will be affected by the reorganization.
The ability to edit Assessment Risks objects in the Assessment lifecycle state also depends on the lifecycle’s Atomic Security on Relationships configuration.
To use the Create Risks from Existing Assessment action, users require the following permissions:
- Create permission on the Assessment Risk and FMEA Process Step objects
- View permission for the Create Risks from Existing Assessment action
- Edit permission for the self-referencing relationship on the Assessment Risk object
To manage documents for Assessment Risks from the Risk Builder, users require the following permissions:
- Edit permission for the Assessment Risk Document object
- Edit permission for the Document field on the Assessment Risk Document object
- All relevant permissions for the applicable document types