Change Action Paths allow your organization’s Admin to configure a Change Control, Quality Event (Change Control object type only), or Change Plan to organize Change Actions in sequential steps based on phases of the Change Control. When configured, QMS will automatically start Change Actions in the order based on the sequencing in the Change Action Steps.
Creating Change Action Paths & Steps
To view and edit Change Action Path configurations, navigate to Admin > Configuration > QMS Action Path Configurations.
To create a Change Action Path:
- From the QMS Action Path Configurations page, click Create.
- Enter a Label and Name for the Change Action Path.
- Use the Status selector to make the field active or inactive.
- Optional: Enter a Description.
- Optional: Select Yes or No for the Hide Other Actions option to hide or display the Other Actions section on a Change Control record. Users utilize this section to add Change Actions outside of Action Steps.
- Optional: Select Yes or No for the Allow Change Actions to be added to In Progress Action Steps option. Once enabled, users can add Change Actions to an In Progress Action Step.
- Select the Parent Object in the drop-down.
- Select the Parent Object Type in the drop-down. Learn more about object types.
- Select Change Action as the Action Object.
- Select one or more Parent Locked States. If a parent object is in any of these states, it will not be moved.
- Click Save.
To create Change Action Steps within a Change Action Path:
- From the QMS Action Path Configuration page, select a Change Action Path. Under QMS Action Step Configurations, click Edit.
- Enter a Label.
- Select the Parent Start State from the drop-down. When parent objects reach this state, actions in the included action states will be moved to the Action Start State.
- Select the Action Start State from the drop-down. Actions in the included action states will be moved to this state when the parent reaches the Parent Start State.
- Select the Included Action States. Actions must be in the included action states to be moved to the Action Start State when the parent reaches the Parent Start State.
- Select the Action Finished States. This is the terminal state for actions in this step. When all actions are in this step, the parent will be moved to the Parent Finish State.
- Select the Parent Finish State. This is the destination state for the parent object when all actions have moved to one of the Action Finish States.
- Optional: Move the Display Order.
- Optional: Under Default Fields to Display, click Edit to set the default columns and column order to display for Action Steps.
- Click Save.
After creating a Change Action Path, you must add the Add Action Path event action to the Create Record event on the parent object lifecycle.
To create an event action on the parent object lifecycle:
Navigate to Admin > Configuration > Object Lifecycles > [Lifecycle] > Event Actions > Create Record. From the Action Path drop-down, select the Change Action Path you created for the parent object.
Creating Multiple Action Paths
Vault allows Admins to create multiple Action Path configurations for a single object and object type configuration. Once records exist using an Action Path, the configuration associated with its Action Steps cannot be changed. However, Admins can create a new Action Path configuration with updated Action Steps to replace the original.
Updating In Progress Actions Steps
If configured by an Admin, users can add Change Actions to Action Steps in an In Progress status via the Create button. Users also can edit a Change Action’s Action Step field and select an Open or In Progress Action Step.
Users also can modify Action Steps directly in an Action Step grid view via the Valid Action Step column. Once the updates are complete, users can collapse and expand the affected Action Steps or refresh their browser and reopen the Action Steps to see the changes.
Adjusting Action Step Columns
Vault displays default columns for Action Steps, but users can add, sort, or remove columns, change the column order, and adjust column widths. Vault saves these changes as user preferences, but users can revert the changes by clicking Restore defaults in the Select Columns to Display dialog.
Action Path Example: GMP Change Control
Note: The processes to use Action Paths and Steps may vary depending on the configuration of this feature by an Admin. This is an example of a typical process.
Suppose your organization creates a GMP Change Control to reset the steady state temperature of a freezer from -80ºC to -70ºC in a microbiology lab.
Some Change Actions need to be executed before others. The Change Control owner defines the appropriate sequencing of Change Actions. When all Change Actions are Completed, the GMP Change Control moves to the In Final Approval state.
Your Vault Admin has configured a Change Action Path for GMP Change Controls that includes a pre-implementation step, followed by an implementation step, and finally a post-implementation step. During the change definition stage of the Change Control process, the Change Control’s owner adds Change Actions to these steps.
The Admin has defined the Change Action Path as follows:
- Pre-Implementation Step
- Change Action: Update any SOPs that mention -80ºC
- Change Action: Update the logbook used to quality check the freezer’s temperature each day.
- Implementation Step
- Change the temperature of the freezer to -70ºC
- Post-Implementation Step
- Perform stability tests on samples after one (1) week at -70ºC
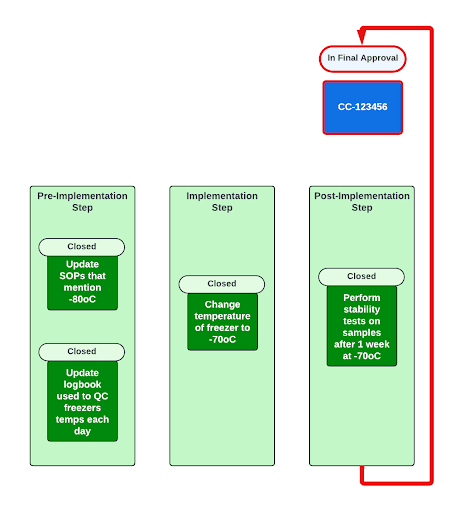
When the GMP Change Control enters the In Pre-Implementation state, QMS starts the Change Actions in the Pre-Implementation Step by automatically moving them to the Start Implementation state.

When the Change Actions in the Pre-Implementation Step are finished and moved to the Closed state, QMS automatically moves the parent Change Control to the In Implementation state, and this automatically moves the Change Action in the Implementation Step to the Start Implementation state.
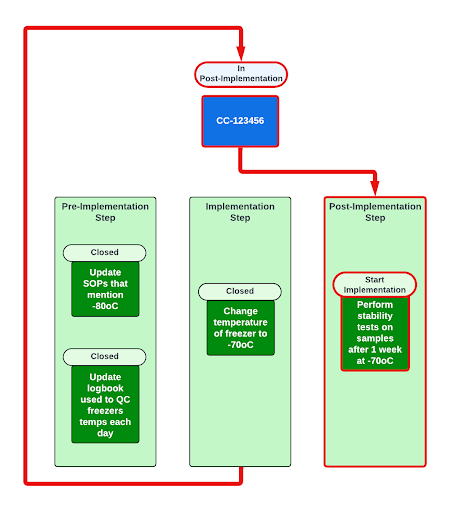
When the Change Action in the Post-Implementation Step is finished and moves to the Closed state, QMS automatically moves the parent Change Control to the In Final Approval state and starts the final approval workflow. Users can create and remove child records from one step to another as long as both steps are open. Users can’t add or remove child records from Steps in the Implementation and Post Implementation states.