The Audit Room application page provides an intuitive interface for audit team members to create, review, respond to, and fulfill requests for a specific audit. Initiating the Enter Audit Room action from an Inspection record navigates you to the Audit Room page. From this page, you can access and view requests, their status, and priority, customizing your view with search modifiers or applied filters. From within the Audit Room, you can drag and drop cards representing Inspection Requests to advance a request through its lifecycle.
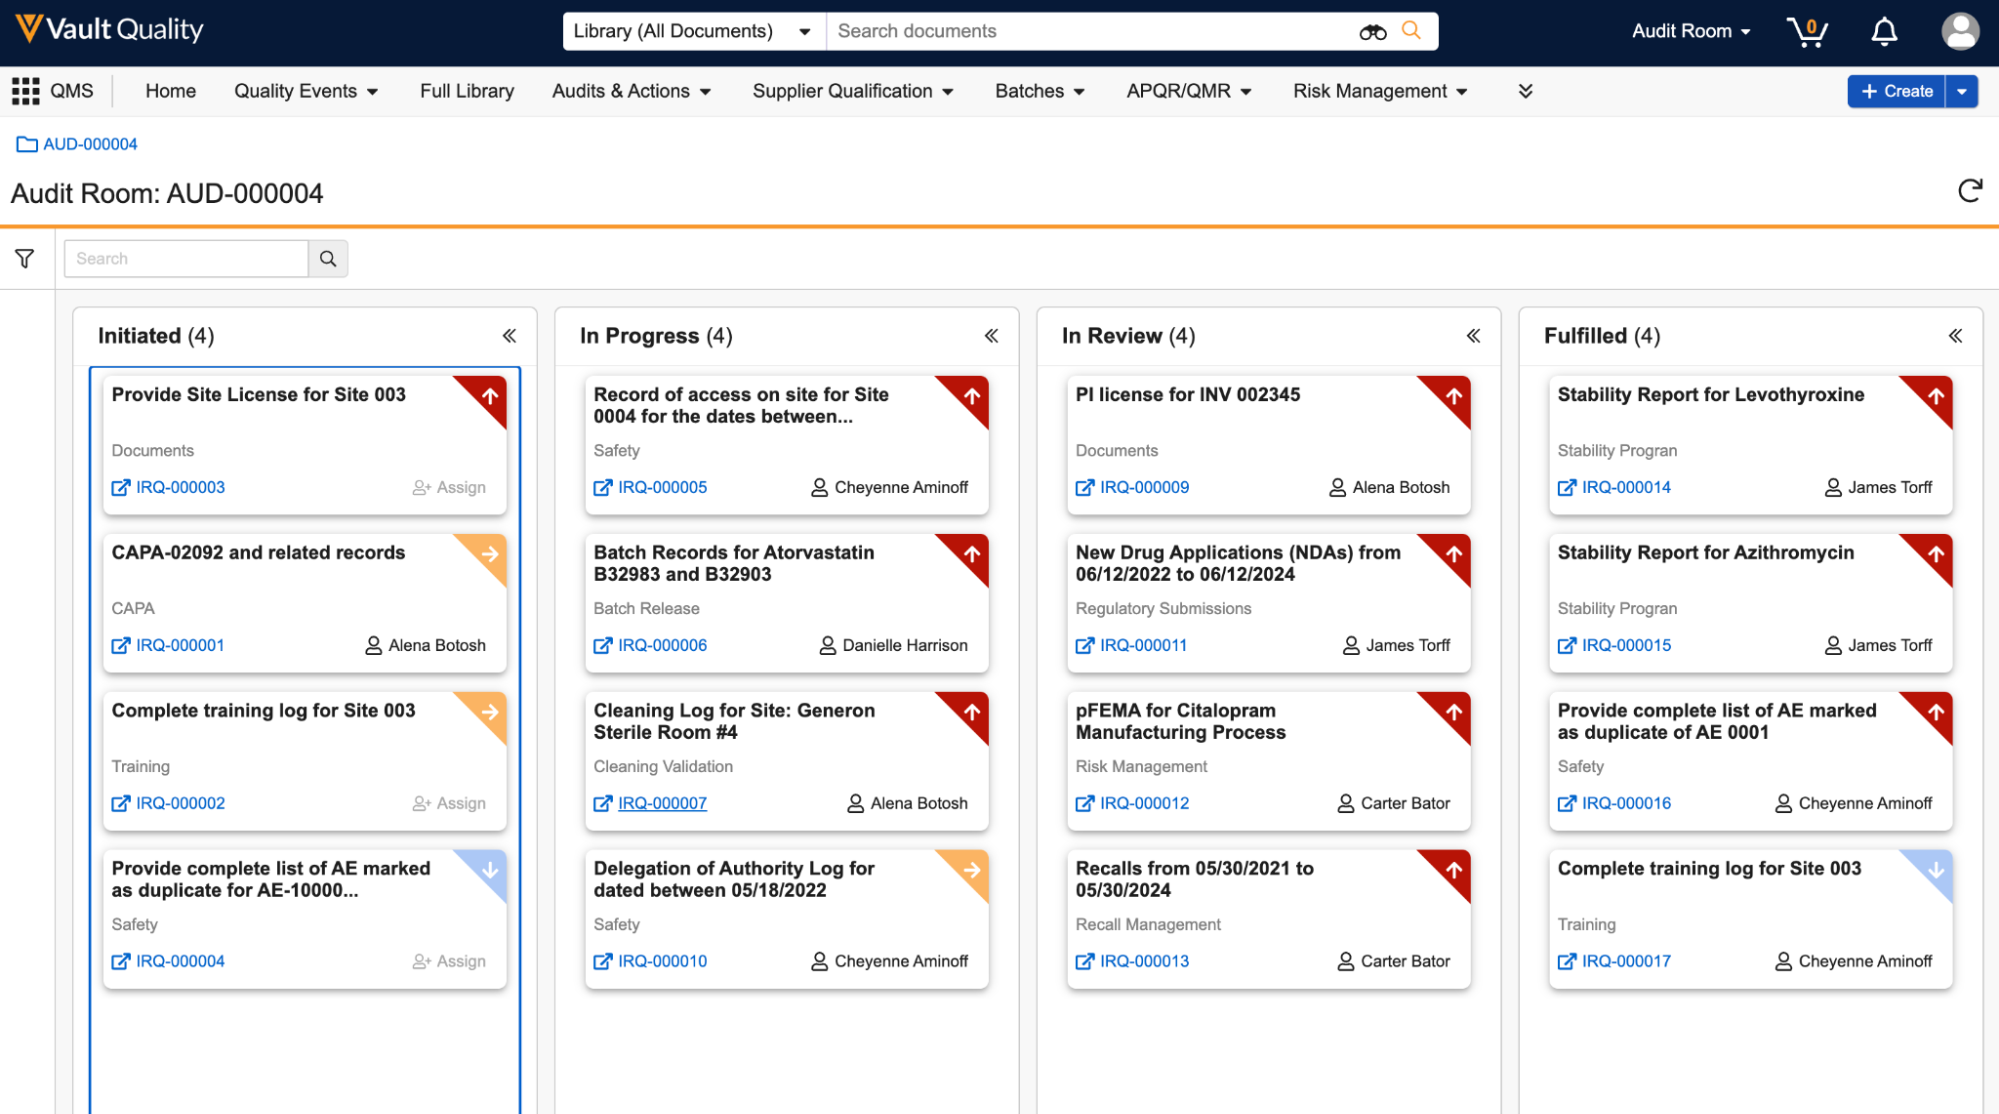
Audit Room Header
This section includes the name of the Audit Room, instantiated upon launching the Audit Room page from an Inspection record.
If available, click the icon in the top right corner to refresh the request cards displayed, preserving any applied filters or search terms. This button becomes visible when Vault detects changes to existing requests or new requests. Vault prompts you to refresh every 15 minutes.
If available, click the icon to navigate to a Scribe Notes document. The Scribe Notes button is not visible if no document is selected for the Scribe Notes field on the parent Inspection record.
Audit Response Team View
The Audit Response Team View displays the status of each request and prioritization indicators. This view organizes Inspection Request records in card form in columns according to their lifecycle states, indicating the number of requests in each state. The view displays them in order of priority (high, medium, or low) and then alphabetically by request number.
Click the chevron arrows at the top of each column to expand and collapse request cards in a particular lifecycle state.
Each request card displays the request’s name, priority, category, assignee, and a hyperlink to navigate to the record. If a request is unassigned, click Assign in the bottom right of a request card to assign a fulfiller. Alternatively, you can click the assignee’s name to reassign a request to another user.
Within this view, you can drag and drop one (1) request card at a time to advance an Inspection Request through its lifecycle. Dragging and dropping a request card into another column executes a state change for the Inspection Request record. Vault may display an error if the record does not satisfy entry criteria before proceeding to the next state. Request cards must enter the Fulfilled state before proceeding to Published. If you move a request card from the Fulfilled state to Published, Vault reminds you in a dialog before publishing the request, and all associated documents and attachments, to an Inspector. Only members of the Front Office can publish a request.
You can search for a specific request from the search bar. If there are no Inspection Requests for a particular audit, the view displays that no items were found.
Filter Panel
Click the filter () icon to filter the request cards shown by their lifecycle state, priority, category, or assignee.
Assigning Requests
On the Audit Room page, you can click Assign in the bottom corner of a request card to assign it to a particular user. In the dialog, choose an Assignee from the drop-down list and click Save. Upon saving, the system updates the request card with the name of the newly assigned user.
Automatic Assignment for Inspection Requests
If configured by an Admin, Vault can automatically assign users in the Fulfiller role to new Inspection Requests. By using Inspection Request Auto Assignment records, audit response teams can establish default rules for automatically assigning Inspection Requests based on the values selected in the User and Request Category fields. This allows teams to streamline the process for splitting up, assigning, and responding to inquiries during an audit. The default assignments are made per audit and can be reassigned manually during the audit as needed. If new team members are added as fulfillers while an inspection is in progress and are not represented on a related Inspection Request Auto Assignment record, users can execute the Generate Auto-Assignment Records action to ensure that the record exists for all fulfillers.
Sending Nudges or Group Nudges
Members of the Audit Room may nudge (send notifications and emails to) individuals regarding specific Inspection Requests or a set of Inspection Requests that match certain filter criteria.
Inspection Requests with an Assignee support a simple Nudge. Unassigned Inspection Requests support the ability to nudge a selection of individuals, often in pursuit of prompting one of them to claim the Inspection Request and assign themselves as the Assignee.
When you click Assign on a request card, you can also select Nudge Assignee, if the Inspection Request is assigned, or Nudge Group, if the Assignee field is blank, to send a notification to one or more Vault users about an Inspection Request that requires their attention. Alternatively, you can select the Send Nudge Notification user action from the Audit Room application page.
When you send a Nudge, Vault displays a dialog that allows you to choose a predefined notification template that you can modify before sending. The message is sent as both a notification in Vault and via email, to ensure that even if the recipients are not logged in to Vault, they receive a message indicating that further action is required on their part.
If you select Nudge Group, Vault utilizes the Inspection Group Fulfiller application role to automatically add users who are not members of the Fulfillment team but who have group tasks related to the inspection to the Inspection Request record. Users added to this role can then assign themselves as the Assignee and perform actions on the Inspection Request based on the security settings configured for the role. Users who are already assigned to the Front Office and Fulfiller roles are not reassigned to the Inspection Group Fulfiller role.
If you click the mail icon on the Audit Room application page, any member of the Audit Room can send a nudge to all Assignees of any Inspection Requests. Vault displays a dialog that allows you to filter Inspection Requests by Priority, Category, and Lifecycle State, select a notification template, and update the Subject and Message if needed. Assignees of Inspection Requests who match the applied filters will receive a notification for each of their assigned Inspection Requests.
Adding Scribe Notes
Audit team members can use Scribe Notes, live-collaboration Microsoft Word documents, to log notes related to the audit collaboratively. Multiple users can view these notes in real time. To utilize Scribe Notes, your Admin must enable Collaborative Authoring in your Vault.
To contribute to an existing Scribe Note, click the icon in the top right corner of the Audit Room page. Vault navigates you to a document linked to the parent Inspection record. From here, you can utilize collaborative authoring to gain access to the document. The Scribe Notes button is not visible if there is no document selected for the Scribe Notes field on the parent Inspection record.
Publishing Requests
You can publish an Inspection Request record via the Publish to Inspectors action on the record or from within the Audit Room by dropping the request card into the Published column. Only members of the Front Office can publish a request. You can only transition a Published request to a fulfilled, canceled, or closed state, upon which the Inspector loses access to that record.
Vault reminds you in a dialog before publishing the request, including all associated documents and attachments, to an Inspector. In the dialog, click Publish to proceed with publishing. If you do not have the required permissions to publish the record, Vault does not complete the state transition and informs you in a dialog. Upon publishing, Vault automatically grants the appropriate Inspector(s) limited access to Vault using VeevaID.
Related Permissions
Admins must configure role-based permissions on the applicable lifecycles. Vault displays an error message if the minimum permissions are not assigned at the object or field level to a user who attempts to access the Audit Room page.
In addition, your security profile must grant the following permissions to access the Audit Room page:
| Type | Permission Label | Controls |
|---|---|---|
| Security Profile | Object: Audit | Ability to view, create, edit, and delete Audits. |
| Security Profile | Object: Inspection Request | Ability to view, create, edit, and delete Inspection Requests. |
| Security Profile | Object: Inspection Request - Document | Ability to view, create, edit, and delete the record linking an Inspection Request to a document. |