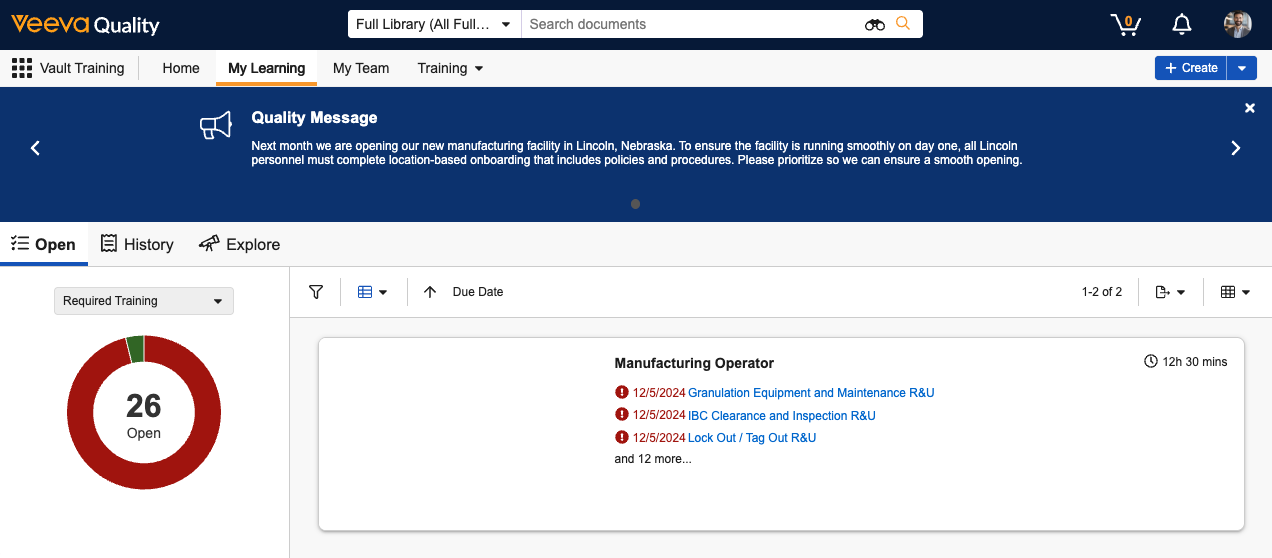
The Learner Homepage is a one-stop tab for Learners to work with thier training assignments and records. Setting the Learner Homepage as the for Learners provides an intuitive interface for new or first-time Vault users.
Enabling the Learner Homepage
In Admin > Users & Groups > Permission Sets, enable View permission for the Veeva Training Learner Homepage: My Learning Page. Then, enable View permission for the My Learning tab. You can relabel the My Learning tab to suit your needs via the Admin > Configuration > Tabs page.
Optionally, you can set the Learner Homepage as the landing tab for Learners, which can be useful for new or first-time Vault users.
See also About the Learner Homepage for additional permissions considerations.
About the Completion Date Field
This feature includes the Training Assignment object’s Completion Date field (completion_date__v), which Vault displays to Learners under the History tab. Depending on when your Vault was created, the Training Assignment object may have a custom Completion Date (completion_date__c) field. We recommend using the standard field to fully leverage this feature, however converting to the standard field is not required.
If your organization would like to use the standard field, this should be minimally updated within:
- Entry Actions within the Training Assignment object lifecycle’s Completed state.
- All Training Assignment object page layouts.
- Any reports referencing the custom field.
About Announcements
The Announcements pane at the top of the Learner Homepage is a communication channel for training-focused messaging, delivering information about your organization’s important internal campaigns or compliance reminders.
Aside from Learner and Training Admin permissions, this feature is automatically available in your Vault without any additional configuration. Training Admins only need to create an Announcement record in Business Admin order for Learners to see an announcement.
However, Training Admins and Vault Admins should consider this feature’s limitations and the below default configuration against your organization’s requirements. Many aspects described here can be updated as required.
- Announcement object records can be created from the Business Admin menu. Training Admins or other users creating Announcements may require a tab in order to create records outside of Business Admin.
- The Announcement object’s standard Title and Message fields determine the content Learners see, and the Start Datetime and End Datetime determine the period during which it is available to them. While a Vault Admin cannot configure these or any additional fields to display to Learners, this object can be configured with additional custom fields for metadata tracking purposes.
- The standard Announcement object lifecycle’s default configuration operates such that:
- Vault immediately moves newly-created Announcement records to the Approved state, which is mapped to a corresponding Approved state type. Records must be in a state mapped to this state type in order for Learners to see them.
- The above state change occurs via the lifecycle’s Create Record event action. The action uses a custom Announcement Workflow, which can be updated to accommodate your organization’s requirements, such as stakeholder approvals.
Creating Announcements
To create an announcement:
- Navigate to Business Admin > Objects > Announcements and click + Create.
- Populate the announcement’s Title and Message (up to 300 characters) that impacted Learners will see, as well as the Start Datetime and End Datetime for the period it will be available to them.
- Optional: Add up to five Conditions to narrow the scope of Learners who will see the announcement, based on Person object fields.
- Click Save.
Vault automatically moves the Announcement record to the Approved state and begins displaying the announcement to Learners upon the Start Datetime.
Limitations
Announcements are subject to the following limitations:
- Announcements can contain up to 300 characters, as reflected by the Message object field.
- Training Admins can configure up to five conditions per Announcement.
- Conditions can be created using text, object reference, picklist, and Yes/No (boolean) Person object fields only.
- All conditions must be true for a given Learner in order for them to see it.
- Learners can see up to ten Announcements which apply to them at any given time, beginning with the earliest Start Datetime.
- Vault does not prevent a Vault Admin from deleting custom Person object fields referenced in a condition. In the event a field is deleted, Vault ignores that condition and removes it the next time a Training Admin edits the Announcement record.
Related Permissions
Learners must be assigned a permission set with Read permission for the Announcements object.
Training Admins must be assigned a permission set with:
- Read, Create, Edit, and Delete permission for the Announcements object. This controls general access to the feature and related records.
- Read object field permissions for applicable fields within the Person object. This controls the fields Training Admins can select when creating Announcement conditions.
About Training Assignment Actions
By default, Learners are not permitted to complete actions from a Training Assignment record. However, when an action is configured on the Training Assignment object lifecycle’s Completed state, Learners can execute actions directly from their homepage’s History tab, as long as they have permission to do so.
This can be useful, for example, when an organization requires Learners to download proof of their training: A Vault Admin can create a formatted output representing key training details, then configure a “Download Certificate of Completion” user action using the Download Formatted Output action. This configuration replaces processes requiring Learners to contact their Manager or a Training Admin for this information.
Enabling the Learner Homepage Resources Section
The Learner Homepage can include additional information and links that your Learners can access alongside their assignments.
To customize this section with your desired information and display it on the Learner Homepage:
- Navigate to Admin > Configuration > Pages > [Veeva Training Learner Homepage: My Learning Page].
- In the Layouts section, click into My Learning Page Layout.
- In the section selector, click Resources Section.
- Click Edit.
- Select the Show Resources Section? checkbox.
- Add text in the Resources Section Label, Questions Subsection Label, and Questions Subsection Value boxes.
- Optional: Add text to the Link Subsection Label and Link [#] Label boxes, and add URLs (starting with
http://orhttps://) to the Link [#] Value boxes. Text entered in a Link [#] Label box displays as a hyperlink, leading to the corresponding Link [#] Value destination. Note that if either the label or corresponding value box lacks content, the link text will not appear. - Click Save.
The resources section will now appear on the Learner Homepage, labeled and populated according to your input.
Changing the Default Learner Homepage View
By default, Learners see the Open tab in Card View upon navigating to their My Learning tab. You can alternately make the Curriculum View or Learner Role View the default view:
- Navigate to Admin > Configuration > Pages > [Veeva Training Learner Homepage: My Learning Page].
- In the Layouts section, click into General Settings.
- Click Edit.
- In the Options section, select Curriculum, Learner Role, or a blank value in the Default Grouped By drop-down.
- Click Save.
You can undo this change by clearing the value from the Default Grouped By drop-down.
Adding or Removing Filter Options
You can configure additional optional filters for Learners to refine their Open, History, and Explore tab views.
To customize the filter options available to Learners:
- Navigate to Admin > Configuration > Pages > [Veeva Training Learner Homepage: My Learning Page].
- In the Layouts section, click into the desired tab layout.
- In the section selector, click Filters.
- Click Edit.
- In the Additional Filters dropdown, select up to five total object reference or picklist fields to allow as filters. You cannot select a dependent object reference field until you select its controlling field. The fields you can select for each tab are located in the following objects:
- Open tab: Curriculum
- History tab: Curriculum
- Explore tab: Training Requirement
- Click Save.
The configured filter options will now appear on the Learner Homepage for all Learners with the appropriate permissions.
Related Permissions
To filter by a picklist field, Learners must have Read permission for that field.
To filter by an object reference field, Learners must have Read permission for the record in which the field appears, as well as Read permission for the referenced record. For example, in order to filter by a Curriculum’s Study field, a Learner must have:
- Read permission for that Curriculum record.
- Read permission for the Study record referenced in the Curriculum’s Study field.
About Card Images
When creating Training Requirements or Curricula, you can customize the card images Vault displays in the Learner Homepage’s Open tab. To do this, select a Vault Library document from the relevant record’s Learner Homepage Card Image field.
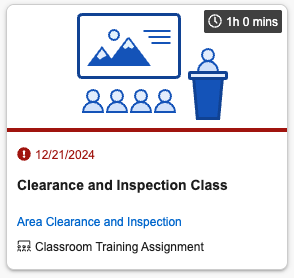
Generally, when you do not configure your own image, Vault displays an image according to assignment type:
- For Vault Document Training Assignments, the card image is the first page of the first document’s viewable rendition.
- For Classroom, Evaluation, and External Training Assignments, Vault displays that type’s default stock image, for example the Classroom Training Assignment card image shown below.
The Learner Homepage additionally displays card images based on the Learner-selected Open tab grouping:
- When the tab is not grouped, Vault displays the default or configured image according to assignment, as described above.
- When the tab is grouped by Learner Role, Vault displays either the first related Curriculum’s configured image, or the first assignment’s configured or default image.
- When the tab is grouped by Curriculum, Vault displays the most overdue assignment’s configured or default image.
Note: The groupings described above only apply to assignments which are not the result of Direct Assignment or Self-Enrollment, according to the Creation Source. The Learner Role tab additionally does not display images for Individual Learner Roles.
About LearnGxP Card Images
Most ContentDirect-subscribed Vaults automatically include card images for LearnGxP courses, unless your organization opts out of this functionality.
Curriculum Sequencing & Prerequisites
Curriculum Sequencing and Curriculum Prerequisites are independent features available with an easy-to-use Curriculum Sequencing Rule Builder page, where Training Admins can suggest or require, respectively, the order in which Learners complete Curricula for a Learner Role.
Along with Substitute and Prerequisite Training Requirements already defined in your organization’s Training Matrix, these capabilities can eliminate:
- The need for Learners to follow new-hire or other training checklists which define training order.
- Manual Training Admin steps, such as adjusting Training Assignment due dates to accommodate a defined training order.
- Training Matrix designs in which duplicate or similar Curricula are in place across multiple Learner Roles. With Curriculum Prerequisites, Curricula can be ordered differently in two Learner Roles but share the same Training Requirements.
See Curriculum Sequencing & Prerequisites for configuration details.
Shareable Self-Enrollment Links & QR Codes
Learners can share courses open for self-enrollment with other Learners via URL or a downloadable QR code. When a recipient opens a shared link, Vault automatically directs them to the course within their own Learner Homepage so that they can enroll themselves.
This feature is automatically available to any Learner. However, Vault Admins can optionally configure the Training Requirement object lifecycle to support sharing via custom user action directly from a Training Requirement record. This can be useful for Training Admins, or any user with access to view Training Requirement records.
To do this:
- Within the Training Requirement object, create a new “Share Self-Enrollment Link” action using the standard object action of the same name.
- Within the Training Requirement object lifecycle’s Ready for Use state, create a new conditional user action such that when Allow Self-Enrollment? equals “Yes”, users can execute the Share Self-Enrollment Link action you created in Step 1.
Limitations
When Training Assignments cannot be assigned to the Learner, Vault displays an error banner on the Learner Homepage. This error means that there are Training Assignments with Errors Encountered? = Yes for the Learner. Contact Veeva Support to troubleshoot this error.
Related Permissions
Learners require Read access to a Training Assignment field to filter or sort by that field.
Additionally, Learners require Read access for the following fields on the Training Assignment object to fully interact with assignments, curricula, and learner role views on the Learner Homepage:
- Allow Self-Registration?
- Assigned Date
- Completion Date
- Content Set
- Creation Source
- Description
- Direct Assignment Request
- Due Date
- Estimated Time to Complete (Minutes)
- Learner
- Learner Choice Made?
- Learner Homepage Card Image
- Part of class
- Prerequisite Status
- Training Job
- Training Requirement
The following permissions relate to interacting with learner role and curriculum cards and the curriculum page:
- If a card image is provided for a Curriculum or Learner Role, the Learner user must have a permission set which includes Read access to the document referenced on the Learner Homepage Card Image field on the Curriculum or Learner Role record to see it in the relevant view and page.
- The Learner user must have a permission set which includes Read access to the Training Assignment object, or else they will receive an error when navigating to the curriculum page or learner role page.